I've been tardy in getting the HV30 posts put together and online, but I've been busy with other stuff, too.
On or around Canada, or the 4th of July if you prefer, Miller & Mullet will be launching a whole bunch of stuff.
With artist Kam Gates, we're kicking off a weekly comic strip. Think of it as the Addams Family (the original Addams' strips) meets Ziggy, or Hitchcock meets Garfield. Something like that. At any rate, Mullet and Kam are coming up with some darkly funny stuff that works best in the 3-5 frame world of comic strips.
Alongside the strip, we're launching a tri-weekly radio series starring Miller and Mullet. I'm doing the post stuff on that project, as well as most of the writing. The nice thing about audio-only is that sound effects are a lot cheaper than visual effects, so we can finally put some ideas to work without having to worry about how much it costs. The radio show will be available on our website and will, hopefully, be available via iTunes as a podcast. Look for Miller & Mullet Radio.
And, as the third prong of our 2009 Extravaganza, we're posting our 2003 project, Babysitters, in chapters on Youtube and as video podcasts at iTunes. Each week, we'll release another chapter in our first major project. this will be the first time Babysitters has been seen since our rough cut screening at Christmas of 2002.
Back to work!
Tuesday, May 12, 2009


Saturday, May 2, 2009
The HV30 White Balance, Part 2
 Okay, now the histograms for our white balance experiment. The first four look similar in the red, green, and blue channels, but there is a significant difference in the luminance (black graph) channel, with more spikes for the Custom white balance setting (unsurprising given it responds to whatever you put in the lens while setting it). It is different from the fully-automated setting, but the spikes are in the same neighbourhood, as is the bump to the left of the spikes.
The two fluorescent settings differ in the luminance channel more than they do in the 3 colour channels. This makes sense as the fluorescent-corrected is intended for lights shifted from the greens of regular fluorescent lights (measured as 4100-4400 K colour temperature) towards the bluer temperature of sunlight (5000-6500 K). Shooting in real daylight creates one spike (or 3 shoved together?) for the daylight-corrected setting, but 3 distinct spikes for the conventional fluorescent setting.
 Looking at the actually Daylight setting, it resembles the fluorescent setting in terms of the luminance, and not the corrected one. Interesting, and not what I expected.
The Shade setting pushes the 3 spikes of the Daylight setting together, with nearly identical colour channel readings for both. The Cloudy setting, by comparison, has luminance spikes somewhere between Daylight and Shade, which makes sense.
 Finally, the tungsten setting, which is designed for the 3000K colour temperature of the halogen incandescent bulb (I’m guessing the 2700K average for conventional incandescent are probably okay with this setting, too). I’ve grouped it with the two fluorescent settings (which I’ve misspelled, perhaps reflecting my past work in the restaurant business…) to see what the 3 artificial light settings do.
As the screen cap from last time shows, this setting spikes in the blue channel farther to the right than the other settings. The three green channels are quite similar, but the tungsten setting pushes the red channel towards the dark side—not surprising given the light bulb gives off a distinct orange-yellow glow and tends to tint everything towards the red. The luminance graph is different, too, with that ragged, wide spike in the bright end of the scale—I’m guessing the heavy shift in the blue channel means the luminance spike moves over, too.
Based on this third histogram comparison, I’d say that the more corrective the white balance setting, the more spikes and shifts in the luminance and colour graphs. The Tungsten and Fluorescent settings correct strong red and green shifts, respectively, by changing the image much more than what we see in the three natural light settings and the daylight-corrected fluorescent settings.
The most detailed histogram is the custom setting, which I had set by zooming into an area of virgin snow and pressing the white balance button to set the camcorder. Going forward, I’ll carry a grey card (backed with a white card) with me in order to manually set the white balance, relying upon the presets only when I forget the card or it’s not practical to shoot one in advance (such as when I shoot a stage show and don’t have the opportunity to set up properly).
Tuesday, April 28, 2009
The HV30 White Balance, Part 1
The next part of the HV30 tour is the white balance settings. There are a number of presets as well as a manual setting. For these tests, the HV30 was in 1080 60i mode, with the Cine Look since I think it will be one of the more frequent settings I use.
 First up, the automatic white balance. I’m guessing the camcorder looks around for the whitest-looking pixels and picks them to represent what white should be. Here, the snow in the park hands the camcorder an easy one.
The snow looks somewhat grey in the sunlight—only the snow across the road in front of the building looks white. Let’s see what the daylight setting does: The snow is whiter in this shot, so I’ll avoid the automatic setting, at least on sunny days.
Next, the cloudy setting. The sky on the day of the shoot was clear and bright, so this is not the setting’s best test:
Next, we get into the Shade setting. I assume this setting works to level out contrasts between things in shadow and any hotspots in the same frame?

Leaving natural light settings, we get into the white balance settings for artificial light. First up, the tungsten setting, probably the worst to use in daylight since it’s looking for a much cooler light temperature: Yup, that’s definitely the wrong setting. Nothing that colour correction in post couldn’t fix, but I’ll bet the reds and greens are probably not as vibrant. We’ll see with the histogram next time.
Next on the bulb part of the tour is the normal fluorescent bulb setting: This isn’t that bad at first glance—certainly a bit darker, but it’s not blue like the tungsten setting, and the brown building still looks brown. The histogram will tell the tale.
Next is the daylight-balanced fluorescent setting: This looks less blue than the normal fluorescent setting. The histogram comparison should be fun!
Finally, we get to the custom setting, or the manual white balance. In order to ensure that the framing was identical to the other white balance settings, I didn’t zoom into the sunlit snow to get an accurate white balance as I would normally do, so the white balance in this clip is based on the entire frame you see here: This doesn’t look too bad—the whites look white, the blues look blue, and the browns look brown. The histogram will tell the tale.
That concludes the white balance comparison for this week. Next week, the long-anticipated histograms of these shots, just to see just how the colour balance changes from setting to setting.
Monday, April 13, 2009
The HV30 Special Scene Recording Programs, Part 2

Okay, here, finally, are the histograms for the special recording programs. Aside from the Fireworks mode, I can see two distinct patterns emerge.
The Beach and Snow programs have two spikes towards the bright (right) side of the graphs for all four channels. The dark (left) side is diminished in comparison to the other programs' histograms, so it's obvious these two programs shift the entire image to the bright side.
On the other hand, the Night, Portrait, Sports, Spotlight, and Sunset histograms look fairly similar: a bump on the left-third of the graph, two or more spikes in the middle, and a somewhat empty right-hand side.
Clearly, I need to do more testing of these programs to see how they work in other situations!
Next time, I'll take a look at the white balance settings.
Tuesday, February 24, 2009
The HV30 Special Scene Recording Programs, Part 1
My tour of the HV30 continues!
The HV30 comes loaded with a whole bunch of presets for typical situations that someone might come across while shooting. There are eight settings (Portrait, Snow, Sports, Spotlight, Beach, Night, Sunset, and Fireworks), and I shot footage with the HV30 in 1080 60i mode, shooting just 10 seconds per setting in order to minimize the shifting sun (directly behind the camera).

First up, the Snow Mode, just because I’m shooting a snowy field. As seen above, the image looks pretty good, with what appears to be balanced colour. The snow in the sunlight looks blown out, though.
The snow in shadow and in the sunlight halfway up on the left doesn’t look blown out, nor does the park sign just right of centre. Something with this setting doesn’t like a mix of shadow and light, even if it’s snow. The tree shadow in the lower right has a slight tint to it—somewhat magenta? That would mean the red and blue is cranked up or the green channel is cut. I’m definitely interested in seeing the histograms for this series of test images!
Next, the Beach Mode:

First thing I noticed was that the shadow of a bare tree (lower right) has lost the magenta the Snow Mode gave it, but the detail is about the same. The broken snow in the lower right is not defined very well—it looks blown out like in Snow Mode. The red channel is definitely subdued here—look at the brick building and the concrete pole on the left side of the image and the office building across the road.
Our third setting of the day is the Night mode. Shooting a snowy field on a bright winter’s day is probably not the best way to test this setting, but I was interested by the differences with this mode compared to Snow and Beach:

Looks darker overall, but I think that’s what anyone would expect. What is interesting is that the broken snow on the lower right is sharp and not blown out. The brick building and the concrete pole have more red to them like the Snow mode compared to the Beach mode, so at this point I’m thinking the Beach mode must chop the red channel down compared to Snow and Night. Good to know!
Next, the Portrait mode. Designed for making people look good in close-ups, probably by doing something with the red channel, here’s what it does with a snow-covered park:

Like the Night mode, this is not the best subject to shoot with this mode. The image is dark, but the broken snow is not blown out, and the brick building and concrete pole don’t seem to have lost any of the red as in the Beach setting. I was struck by how similar this image was to the Night mode image—I had to go back and make sure I hadn’t used the same image twice by mistake. When I do another round of tests, I’ll have to find a better subject to fully understand how the Portrait Mode affects the HV30’s performance.
Next, the Sports Mode. My first guess was that this mode would speed up the shutter speed to better capture fast action, but I have a TV with a sports setting that shifts the colour balance away from the red channel (the TV’s movie setting definitely warms up and image by shifting towards the red).

Here’s what the Sports Mode did with my snowy park. It resembles the Portrait and the Night Modes. The broken snow is not blown out, and the image is darker overall. The red in the brick building and the concrete pole doesn’t look altered at all (a red car happened to pass through and other than being dark, it looks red).
Next, the Spotlight mode. Interesting to see how it compensates for the dark and light areas in the frame—it seems to darken everything equally:

The dark is definitely darker, and the lighter areas are definitely darker, too, so this is clearly the wrong setting to use in this type of situation. I’m looking forward to comparing the histograms for the last 3 modes, just to see what the differences are.
Next, I fired up the Sunset Mode (which I assume could be used for sunrises, too?).

It looks like it’s somewhere in the middle of the pack. The broken snow is still sharp, and the red channel doesn’t look suppressed, but it’s a brighter image.
Finally, my favourite of these tests: the Fireworks mode. Not surprisingly, a snow-covered park doesn’t work with this image at all. I captured a perfectly white image:

I never suspected changing the recording program on the HV30 would crack me up, but this one did! Rest assured, I shot all 10 seconds of this blank shot like the others (and the HV30 still worked after I was done). This setting must work better in low-light, high-contrast situations. Again, this is one I’ll have to test under much different conditions.
Next time, the histograms of these pics to see what exactly the HV30 did for each mode.
The HV30 comes loaded with a whole bunch of presets for typical situations that someone might come across while shooting. There are eight settings (Portrait, Snow, Sports, Spotlight, Beach, Night, Sunset, and Fireworks), and I shot footage with the HV30 in 1080 60i mode, shooting just 10 seconds per setting in order to minimize the shifting sun (directly behind the camera).

First up, the Snow Mode, just because I’m shooting a snowy field. As seen above, the image looks pretty good, with what appears to be balanced colour. The snow in the sunlight looks blown out, though.
The snow in shadow and in the sunlight halfway up on the left doesn’t look blown out, nor does the park sign just right of centre. Something with this setting doesn’t like a mix of shadow and light, even if it’s snow. The tree shadow in the lower right has a slight tint to it—somewhat magenta? That would mean the red and blue is cranked up or the green channel is cut. I’m definitely interested in seeing the histograms for this series of test images!
Next, the Beach Mode:

First thing I noticed was that the shadow of a bare tree (lower right) has lost the magenta the Snow Mode gave it, but the detail is about the same. The broken snow in the lower right is not defined very well—it looks blown out like in Snow Mode. The red channel is definitely subdued here—look at the brick building and the concrete pole on the left side of the image and the office building across the road.
Our third setting of the day is the Night mode. Shooting a snowy field on a bright winter’s day is probably not the best way to test this setting, but I was interested by the differences with this mode compared to Snow and Beach:

Looks darker overall, but I think that’s what anyone would expect. What is interesting is that the broken snow on the lower right is sharp and not blown out. The brick building and the concrete pole have more red to them like the Snow mode compared to the Beach mode, so at this point I’m thinking the Beach mode must chop the red channel down compared to Snow and Night. Good to know!
Next, the Portrait mode. Designed for making people look good in close-ups, probably by doing something with the red channel, here’s what it does with a snow-covered park:

Like the Night mode, this is not the best subject to shoot with this mode. The image is dark, but the broken snow is not blown out, and the brick building and concrete pole don’t seem to have lost any of the red as in the Beach setting. I was struck by how similar this image was to the Night mode image—I had to go back and make sure I hadn’t used the same image twice by mistake. When I do another round of tests, I’ll have to find a better subject to fully understand how the Portrait Mode affects the HV30’s performance.
Next, the Sports Mode. My first guess was that this mode would speed up the shutter speed to better capture fast action, but I have a TV with a sports setting that shifts the colour balance away from the red channel (the TV’s movie setting definitely warms up and image by shifting towards the red).

Here’s what the Sports Mode did with my snowy park. It resembles the Portrait and the Night Modes. The broken snow is not blown out, and the image is darker overall. The red in the brick building and the concrete pole doesn’t look altered at all (a red car happened to pass through and other than being dark, it looks red).
Next, the Spotlight mode. Interesting to see how it compensates for the dark and light areas in the frame—it seems to darken everything equally:

The dark is definitely darker, and the lighter areas are definitely darker, too, so this is clearly the wrong setting to use in this type of situation. I’m looking forward to comparing the histograms for the last 3 modes, just to see what the differences are.
Next, I fired up the Sunset Mode (which I assume could be used for sunrises, too?).

It looks like it’s somewhere in the middle of the pack. The broken snow is still sharp, and the red channel doesn’t look suppressed, but it’s a brighter image.
Finally, my favourite of these tests: the Fireworks mode. Not surprisingly, a snow-covered park doesn’t work with this image at all. I captured a perfectly white image:

I never suspected changing the recording program on the HV30 would crack me up, but this one did! Rest assured, I shot all 10 seconds of this blank shot like the others (and the HV30 still worked after I was done). This setting must work better in low-light, high-contrast situations. Again, this is one I’ll have to test under much different conditions.
Next time, the histograms of these pics to see what exactly the HV30 did for each mode.
Tuesday, February 17, 2009
The HV30 Recording Programs, Part 2


Continuing from last week, here are the histograms for the HV30 program mode tests. I used the same TIFF files as last time, loading them into Photoshop. The histograms are screen captures from Photoshop.
I had to head to Wikipedia to figure out how to read these graphs, so I'm relying on the information there being accurate! The top row (in black) shows the luminosity for each setting, with the left side being the darkest and right the brightest. The higher the peak, the more pixels there are in the image at that particular luminance.
The colour graphs show the locations of the RGB pixels, with the darkest values on the left and the lightest values on the right. Therefore, a white pixel will appear on the far right side of all four graphs, and a black pixel will appear on the far left of all four.
The overall shape is roughly the same for each program setting, with that somewhat phallic peak in the centre or to the right of the centre, but there are some significant differences between them.
In the Program AE mode, where the HV30 has complete control over the shutter and aperture settings, the camcorder spreads the phallus into three distinct columns for luminosity reading, and adds a peak to the right side where the other settings have a slight bump.
The Av and Tv histograms are nearly identical, so I’ll need to do more testing. I have read opinions favouring shutter or aperture control for shooting quality video, so this bears further testing to see what works best with the HV30 in a wider range of tests.
The Cine Mode setting shows the most differences between itself and the other three programs. This mode really clamps down on the brightest 1/3 of the luminosity and the three colour channels. The lower end, the blacks, is also a bit different—the little spikes, particularly in the blue channel, are compressed compared to the other graphs. Where Cine Mode boosts the image is the mountain to the left of the phallus—all four readings are higher there than the other three program settings. This finding matches what I've read about how the film-look settings on camcorders work to match how film captures luminosity and colour.
This round of test shows what the four program settings can do. I can see that the Cine Mode is significantly alters the image, so I will definitely pursue further testing with these settings in other conditions, particularly the Tv and Av modes. I don't know if the Cine Mode's changes can be reversed in post, so I want to see if another mode provides a better canvas to do colour-correction in post.
Next week, the special scene recording programs.
Wednesday, February 4, 2009
The HV30 Recording Programs, Part 1


It was warm enough outside this weekend, finally, to take the HV30 out and shoot some stuff. I really haven’t had much opportunity to use the HV30 so far this winter as we’re not shooting anything right now and the weather’s been cold and snowy on the weekends.
The first thing I did was play with the recording programs, so this week’s missive is devoted to seeing what they do.
I put the HV30 into the default HDV 1080 60i recording mode for all of these tests, and I went to a small park covered with snow (with a busy street in the background to give some contrast to the snow). I even found an angle that put some shadows on the snow, just for detail. Then I shot just 10 seconds at each setting to minimize the effect of the sun moving west (I had some tall apartment buildings behind me, so I had to hurry to avoid the long shadows that were creeping in from left of the frame). I put the camera facing north-north-east, so the sun is almost directly behind the camera.
For the screen caps below and in the subsequent tests, I captured the footage using Final Cut Pro, and then exported them as TIFs. I captured using the HDV 1080 60i settings. From there, I put them in Photoshop and used the Save for Web option to convert them to JPEGs, using the ICC medium JPEG setting. I think I minimized the changes to colour, contrast, etc., that file conversion would have brought about.
The HV30 comes with four recording programs (Program AE, Shutter Priority, Aperture Priority, and Cine Mode). First, the Program AE mode, in which the HV30 has control of both the shutter and aperture. This is the point-and-shoot mode:

I consider this the baseline since the HV30’s brain is doing all the work. This is what the Panasonic engineers came up with in terms of the optimum exposure settings. There’s not a lot of red, other than the brown brick building to the left and the yellow fire hydrant in the right-centre, so I think the blue channel is probably doing most of the work in this shot. The white snow across the street, in direct sunlight, is pure white here, and the snow and sign in the foreground both look white. And the blue sky is just as blue as it was on the day.
Next, the Tv mode, where the shutter speed is manual and the aperture is controlled by the HV30. In this case, the shutter speed was at 1/100:
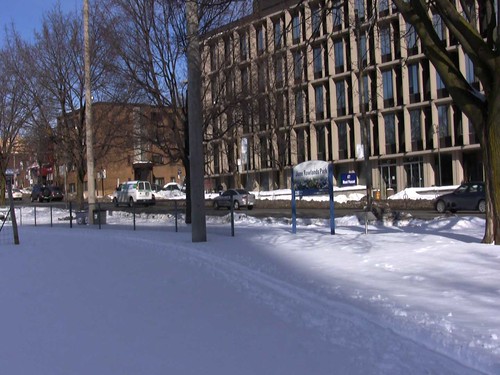
The blue sky looks bluer here, but I can’t really see a difference between this image and the Program AE image.
Next up, the Av mode, where the aperture is manual and the camcorder controls the shutter. I didn’t change the aperture value when I switched from Tv to Av, and I didn’t write down what the aperture setting was, so I don’t know what the aperture was actually set at! At any rate, here’s what it looks like:

It’s pretty much identical to the Tv mode, so the camcorder didn’t change anything when I went from one setting to the other. I am planning on testing the Tv and Av modes more extensively later on.
Finally, here’s the Cine Mode still. This setting has no manual controls, so the HV30 is doing all the work here but trying to give the image a film-like exposure:

It looks a bit darker, and the snow in the forground looks more grey than blue compared to the previous screen caps. The contrast seems to be compressed a bit—the whites are less bright and the darks are less dark. The colour of the fire hydrant across the road looks the same, but the blue sky is definitely a different tone than the earlier settings.
I will post histograms of these four images next time, just to see what exactly the differences are.
Next up, the Av mode, where the aperture is manual and the camcorder controls the shutter. I didn’t change the aperture value when I switched from Tv to Av, and I didn’t write down what the aperture setting was, so I don’t know what the aperture was actually set at! At any rate, here’s what it looks like:
It’s pretty much identical to the Tv mode, so the camcorder didn’t change anything when I went from one setting to the other. I am planning on testing the Tv and Av modes more extensively later on.
Finally, here’s the Cine Mode still. This setting has no manual controls, so the HV30 is doing all the work here but trying to give the image a film-like exposure:
It looks a bit darker, and the snow in the forground looks more grey than blue compared to the previous screen caps. The contrast seems to be compressed a bit—the whites are less bright and the darks are less dark. The colour of the fire hydrant across the road looks the same, but the blue sky is definitely a different tone than the earlier settings.
I will post histograms of these four images next time, just to see what exactly the differences are.
Wednesday, December 10, 2008
JCVD and RocknRolla: Comebacks I’ve Seen

I have seen two interesting movies in recent weeks, two projects that mark the comeback attempts of two men whose careers have seen better days.
The first movie was RocknRolla, Guy Ritchie’s return to his roots, the crime comedies Lock, Stock and Two Smoking Barrels and Snatch. Between Snatch and RocknRolla, Ritchie directed his wife Madonna in Swept Away, one of the worst movies I’ve ever seen (although I saw it at an anti-Valentine’s Day party where the partygoers suggested dialogue that made the screening fun). I have been advised to avoid Revolver, the next movie in his filmography, so I haven’t watched it.
RocknRolla has a lot of the touches that Ritchie brought to Lock, Stock and to Snatch, but it’s not quite of the same quality—the editing seemed muddled somehow. Where in the early movies, the characters and relationships were established by a rapid pace, a fun narrator, and some great performances , RocknRolla doesn’t seem to do the same. Sure, there’s rapid editing, narration, and some great performances, but it’s really not clear as to what One Two’s relationship is to rest of the London underworld portrayed in the movie. In the first two movies, it was quite clear as to who and where the characters were in their world, and Ritchie’s failure to achieve the same in RocknRolla took me out of the movie as I wondered who these people were.
Guy Ritchie’s comeback has started as his marriage to Madonna comes to an end in the glare of the media klieg lights, but he’s still not as sharp as he was ten years ago. RocknRolla is entertaining, and there are some amazing things in it (Toby Kebbell’s performance as rock star Johnny Quid is one of the best I’ve seen in any movie in 2008).
JCVD is the 2nd comeback movie I’ve seen this month, and it succeeds much better than Guy Ritchie’s movie. Jean-Claude Van Damme, the king of the action movie during the VHS years, makes a comeback with a great performance as a burned-out version of himself.
The movie itself is directed by French director Farouk El Mechri, and it is a stylish, fast-movign Rashomon –type story, showing Jean-Claude in a spot of trouble that is both hilarious and gripping. Van Damme’s performance is world-weary and touching, the martial art gymnastics ignored in favour of his acting chops, and he carries the movie over some pretension that could have torpedoed it with a lesser actor. A soliloquy, featuring Van Damme floating amongst the studio lights, could have been horrible, but Van Damme pulls it off and it becomes moving (no pun intended) as he looks back on his life and shows the price he’s paid.
I hope Van Damme and Ritchie both succeed in their comeback efforts—Van Damme was a revelation in JCVD, and Ritchie’s first two features are still favourites of mine.
Tuesday, November 11, 2008
Capturing from the HV30
Having spent my half hour on Yonge shooting with the brand-new HV30, it was time to capture. I’m using Final Cut Studio 1, so Final Cut itself is version 5.0.4 on my 1.6 GHz G5 tower. I connected the HV30 to the G5 via the Firewire 400 port on the front panel, with my capture drive plugged into the Firewire-800 port to keep the two devices on separate busses.
Setting the in and out points for batch capturing is the same as regular DV, but doing the batch capture itself seems to run into timecode errors on a regular basis. I seemed to hit an error every other or every 3rd capture, but clicking on OK sent FCP back to work and it would capture everything okay during the 2nd or 3rd attempt. The capture window for HDV is different than the one for regular DV, and you don’t get the image mirrored in FCP as you capture. Not a big deal as I normally watch the camcorder’s flip-screen during capture.
Capturing the first shot, the 24p, took no more time than usual, once I’d gone through the first timecode error message. Putting the clip on the timeline prompted a red render line across the top of that window, so I started to render. FCP said it would take 9 minutes to render the 30-second 24p clip, but I think it was closer to 4 minutes. Exporting said clip to QuickTime (without conversion) took seconds—it must spit out the render file pretty much as is. Here’s the 24p footage after Youtube got its hands on it:
I exited FCP and set up a new project in order to capture the same clip using Apple’s intermediate HDV codec. The 30 second 24p intermediate clip didn’t require rendering, and the export prompted a warning of 11 minutes, which was probably less than 2 minutes in total. Here’s what the lower-res 24p footage looks like:
Exiting FCP again, I set up a 30p project file. As with 24p, FCP indicated rendering was needed. The 30-second 30p clip generated a 2-minute estimate but actually took about a minute and a half to render, so it’s clearly less complicated for FCP compared to the 24p clips. I’m no engineer, but I’m guessing that it’s easier to pull the 30p data off the 60i tape feed from the camcorder. Exporting the 30p clip took a few seconds. And here’s the clip:
The next setting was the plain-Jane HDV, the 1080i format. Capture wasn’t a problem, and putting the clip into the timeline prompted the red render line. FCP initially reported 12 minutes to render, but the counter fluttered between 10, 11, and 12 minutes in the first 30 seconds or so. In actual time, the rendering took about 10 and a half minutes, so for 1080i, FCP guessed fairly accurately. Again, the export to QuickTime took 4-5 seconds, and this is what it looks like:
Capturing a clip shot in regular 60i standard-def DV was problematic. The easy setup choice for DV didn’t work—I kept getting timecode errors. I went in and played with the manual settings (mostly by selecting something else and then going back to the proper setting), and it started to capture. I got the audio rate mismatch error message when it was done, so I’ll have to go back and try to match what is undoubtedly not a 48k sample rate on the camcorder. Strangely, I had to render the clip once I plopped it into the timeline—clearly it’s not pure DV or I’ve missed a setting somewhere (the clip appeared fine in the viewer, but was a tiny square in the middle of the Canvas view before and after rendering). I went back to the manual the next day and realized I had left the HV30’s export setting at HDV instead of switching to standard-def DV—I’ll do a another test with the other setting to see how it turns out. Exporting this first attempt to QuickTime took just a few seconds. Here’s what it looks like (don’t squint too hard):
Finally, I set up a FCP project to compare the 24p and the 24p Apple Intermediate codecs. FCP didn’t seem to like me mixing the two on the same timeline as the image sizes changed when I dropped the 2nd type into the timeline. I set up some graphics and some split-screen action to compare. Rendering took about 2 minutes, and the export took less than 5 seconds (clearly, those render files are going straight into the QuickTime files). Here’s the comparison as it appeared:
This clip took very little time for Compressor to convert to the Youtube settings as detailed at Ken Stone’s site (here’s the article that I followed to set up Youtube 4:3 and widescreen presets) compared to DV clips (it takes at least 3 hrs to render a 2-minute DV clip, so the two formats are clearly quite different). The other HDV clips took much less time than past DV clips I’ve converted using these settings, too.
The Youtube website itself took longer to upload those clips, so any speed gains in Compressor seemed offset by slowdowns with YouTube. I had assumed that HD footage would take longer for both steps, so it’s a fair tradeoff.
Next time, I hope to have my 2nd field trip tests and results, this time to explore the different manual and preset options, and to try setting the export settings to DV for the old-school shots.
Setting the in and out points for batch capturing is the same as regular DV, but doing the batch capture itself seems to run into timecode errors on a regular basis. I seemed to hit an error every other or every 3rd capture, but clicking on OK sent FCP back to work and it would capture everything okay during the 2nd or 3rd attempt. The capture window for HDV is different than the one for regular DV, and you don’t get the image mirrored in FCP as you capture. Not a big deal as I normally watch the camcorder’s flip-screen during capture.
Capturing the first shot, the 24p, took no more time than usual, once I’d gone through the first timecode error message. Putting the clip on the timeline prompted a red render line across the top of that window, so I started to render. FCP said it would take 9 minutes to render the 30-second 24p clip, but I think it was closer to 4 minutes. Exporting said clip to QuickTime (without conversion) took seconds—it must spit out the render file pretty much as is. Here’s the 24p footage after Youtube got its hands on it:
I exited FCP and set up a new project in order to capture the same clip using Apple’s intermediate HDV codec. The 30 second 24p intermediate clip didn’t require rendering, and the export prompted a warning of 11 minutes, which was probably less than 2 minutes in total. Here’s what the lower-res 24p footage looks like:
Exiting FCP again, I set up a 30p project file. As with 24p, FCP indicated rendering was needed. The 30-second 30p clip generated a 2-minute estimate but actually took about a minute and a half to render, so it’s clearly less complicated for FCP compared to the 24p clips. I’m no engineer, but I’m guessing that it’s easier to pull the 30p data off the 60i tape feed from the camcorder. Exporting the 30p clip took a few seconds. And here’s the clip:
The next setting was the plain-Jane HDV, the 1080i format. Capture wasn’t a problem, and putting the clip into the timeline prompted the red render line. FCP initially reported 12 minutes to render, but the counter fluttered between 10, 11, and 12 minutes in the first 30 seconds or so. In actual time, the rendering took about 10 and a half minutes, so for 1080i, FCP guessed fairly accurately. Again, the export to QuickTime took 4-5 seconds, and this is what it looks like:
Capturing a clip shot in regular 60i standard-def DV was problematic. The easy setup choice for DV didn’t work—I kept getting timecode errors. I went in and played with the manual settings (mostly by selecting something else and then going back to the proper setting), and it started to capture. I got the audio rate mismatch error message when it was done, so I’ll have to go back and try to match what is undoubtedly not a 48k sample rate on the camcorder. Strangely, I had to render the clip once I plopped it into the timeline—clearly it’s not pure DV or I’ve missed a setting somewhere (the clip appeared fine in the viewer, but was a tiny square in the middle of the Canvas view before and after rendering). I went back to the manual the next day and realized I had left the HV30’s export setting at HDV instead of switching to standard-def DV—I’ll do a another test with the other setting to see how it turns out. Exporting this first attempt to QuickTime took just a few seconds. Here’s what it looks like (don’t squint too hard):
Finally, I set up a FCP project to compare the 24p and the 24p Apple Intermediate codecs. FCP didn’t seem to like me mixing the two on the same timeline as the image sizes changed when I dropped the 2nd type into the timeline. I set up some graphics and some split-screen action to compare. Rendering took about 2 minutes, and the export took less than 5 seconds (clearly, those render files are going straight into the QuickTime files). Here’s the comparison as it appeared:
This clip took very little time for Compressor to convert to the Youtube settings as detailed at Ken Stone’s site (here’s the article that I followed to set up Youtube 4:3 and widescreen presets) compared to DV clips (it takes at least 3 hrs to render a 2-minute DV clip, so the two formats are clearly quite different). The other HDV clips took much less time than past DV clips I’ve converted using these settings, too.
The Youtube website itself took longer to upload those clips, so any speed gains in Compressor seemed offset by slowdowns with YouTube. I had assumed that HD footage would take longer for both steps, so it’s a fair tradeoff.
Next time, I hope to have my 2nd field trip tests and results, this time to explore the different manual and preset options, and to try setting the export settings to DV for the old-school shots.
Monday, November 3, 2008
The New Camcorder
And the winner is….
I went with the HV30, the front-runner of my little contest. The DV Shop had the best price I’ve seen (and I’ve bought a lot of stuff from them in the past and I like the store).
I would have shot an unboxing video… if I’d had anything to shoot with. I got the camcorder home, unpacked it (everything that was supposed to be in the box was, happily, there), installed the battery, and left it to charge overnight.
The HV30 battery is a different beast than the Ultura’s battery, so I won’t be able to carry over the old batteries, which still provide me with many hours of power after nearly 9 years of use. When I buy extra batteries for the HV30, I hope they last as long as the Ultura's did!
On the other hand, the HV30’s 43mm lens threading allows me to carry over a few things. My 46mm Canon wide-angle and telephoto lenses will fit on the HV30 once I get the proper 43/46 stepping ring (I’d been using a 27.5/46 stepping ring for the Ultura). And I’ll still be able to use Cokin filters, once I replace the filter-holder ring with a 43mm ring, so I'll be able to use my circular polarizer (the HV30 has neutral density filters built in, but I can add extras as needed).
After setting the date, time, and time zone (all the North American zones represented by American cities, so my HV30 thinks it’s in New York!), I set out to test it. I was looking for something with a lot of movement to better compare 24p, 30p, and the 1080i modes, so I went over to Yonge Street and shot from Beltline bridge overlooking the subway and Yonge.
I brought the manual to figure out where settings were hidden in menus to get started, but the camera is well designed, and I had no problems figuring how to operate it after reading the manual, particularly the menu items listings.
The manual warned about mixing formats on the same tape, so I put gaps on the tape between the different shots. I let the camera roll during the red light on Yonge so I could get a consistent shot for each to compare, and the subway added movement on the other side of the screen at random moments.
I kept the HV30 in the cine-look recording program for all the shots, as well as the daylight white balance setting (for sunny outdoor shooting), just to make comparing the different formats more scientific. I’ll play with exposure, shutter speed, and other settings in a future outing.
After about a half hour, I’d shot footage in the 24p, 30p, and 1080i HDV formats, and I also shot some standard definition 60i DV as well.
Next time: the first capture.
I went with the HV30, the front-runner of my little contest. The DV Shop had the best price I’ve seen (and I’ve bought a lot of stuff from them in the past and I like the store).
I would have shot an unboxing video… if I’d had anything to shoot with. I got the camcorder home, unpacked it (everything that was supposed to be in the box was, happily, there), installed the battery, and left it to charge overnight.
The HV30 battery is a different beast than the Ultura’s battery, so I won’t be able to carry over the old batteries, which still provide me with many hours of power after nearly 9 years of use. When I buy extra batteries for the HV30, I hope they last as long as the Ultura's did!
On the other hand, the HV30’s 43mm lens threading allows me to carry over a few things. My 46mm Canon wide-angle and telephoto lenses will fit on the HV30 once I get the proper 43/46 stepping ring (I’d been using a 27.5/46 stepping ring for the Ultura). And I’ll still be able to use Cokin filters, once I replace the filter-holder ring with a 43mm ring, so I'll be able to use my circular polarizer (the HV30 has neutral density filters built in, but I can add extras as needed).
After setting the date, time, and time zone (all the North American zones represented by American cities, so my HV30 thinks it’s in New York!), I set out to test it. I was looking for something with a lot of movement to better compare 24p, 30p, and the 1080i modes, so I went over to Yonge Street and shot from Beltline bridge overlooking the subway and Yonge.
I brought the manual to figure out where settings were hidden in menus to get started, but the camera is well designed, and I had no problems figuring how to operate it after reading the manual, particularly the menu items listings.
The manual warned about mixing formats on the same tape, so I put gaps on the tape between the different shots. I let the camera roll during the red light on Yonge so I could get a consistent shot for each to compare, and the subway added movement on the other side of the screen at random moments.
I kept the HV30 in the cine-look recording program for all the shots, as well as the daylight white balance setting (for sunny outdoor shooting), just to make comparing the different formats more scientific. I’ll play with exposure, shutter speed, and other settings in a future outing.
After about a half hour, I’d shot footage in the 24p, 30p, and 1080i HDV formats, and I also shot some standard definition 60i DV as well.
Next time: the first capture.
Wednesday, October 29, 2008
The New Camcorder Search, Part 3
Having spent the last few weeks studying the camcorder market, I realized I had to develop a list of criteria to make the decision to buy a new camcorder. The falling Canadian dollar also became a factor—with retail prices on electronics undoubtedly to rise as a result, I had to decide sooner rather than later. So… here are the four main criteria in my decision-making:
1. Mini-DV format
2. Firewire/IEEE1394 equipped
3. Final Cut Studio compatible.
4. HD and SD capable
Compression is the main factor behind the first two items. Mini-DV and Firewire are still the best in terms of the least amount of compression applied by the camcorder or computer. Hard drive, DVD-RAM, and flash memory camcorders use higher compression than mini-DV cameras, so tape still wins (until I can afford those fancy P2 card systems). USB-2 is faster than USB, but it’s still not as good as Firewire. I’d rather not add additional compression by using a slow transfer bus.
The third criteria is dictated by the computer I’m using for post-production. I’m not upgrading from Final Cut Studio 1 as explained in an earlier post, so the camcorder has to work with it and the G5. From what I’ve read on various websites and forums, as long as you correctly tell Final Cut what kind of footage you’re uploading, it should be able to accept any SD or HDV camcorder. Mini-DV cams record video as 60i even in 30p or 24p format, but FCS can handle the various pull-down ratios. Most of the problems I’ve read about on the HV20 User and other forums are related to people not setting the right format before attempting to capture. And Adobe AfterEffects has some additional capacity for dealing with pulldown ratios if Final Cut can’t.
Finally, with HD becoming so prominent in broadcast, online, and home entertainment video, the smart choice is to buy an HD camcorder. I still need something that can play SD video for the projects already shot on SD. So it has to be a dual-format camcorder.
Other factors, although not critical, are related to the fact that I’m replacing a camcorder. I don’t think Canon has changed the form factor of their batteries, so my still-good Ultura batteries could be carried over to another Canon (this, of course, gives a boost to the HV30). An XLR mike input would be really nice having used an inline transformer with the Ultura for all this time. And if the new camcorder fits in my camcorder bag, I’ll be happy.
Next week, the decision and the purchase
1. Mini-DV format
2. Firewire/IEEE1394 equipped
3. Final Cut Studio compatible.
4. HD and SD capable
Compression is the main factor behind the first two items. Mini-DV and Firewire are still the best in terms of the least amount of compression applied by the camcorder or computer. Hard drive, DVD-RAM, and flash memory camcorders use higher compression than mini-DV cameras, so tape still wins (until I can afford those fancy P2 card systems). USB-2 is faster than USB, but it’s still not as good as Firewire. I’d rather not add additional compression by using a slow transfer bus.
The third criteria is dictated by the computer I’m using for post-production. I’m not upgrading from Final Cut Studio 1 as explained in an earlier post, so the camcorder has to work with it and the G5. From what I’ve read on various websites and forums, as long as you correctly tell Final Cut what kind of footage you’re uploading, it should be able to accept any SD or HDV camcorder. Mini-DV cams record video as 60i even in 30p or 24p format, but FCS can handle the various pull-down ratios. Most of the problems I’ve read about on the HV20 User and other forums are related to people not setting the right format before attempting to capture. And Adobe AfterEffects has some additional capacity for dealing with pulldown ratios if Final Cut can’t.
Finally, with HD becoming so prominent in broadcast, online, and home entertainment video, the smart choice is to buy an HD camcorder. I still need something that can play SD video for the projects already shot on SD. So it has to be a dual-format camcorder.
Other factors, although not critical, are related to the fact that I’m replacing a camcorder. I don’t think Canon has changed the form factor of their batteries, so my still-good Ultura batteries could be carried over to another Canon (this, of course, gives a boost to the HV30). An XLR mike input would be really nice having used an inline transformer with the Ultura for all this time. And if the new camcorder fits in my camcorder bag, I’ll be happy.
Next week, the decision and the purchase
Tuesday, October 21, 2008
The New Camcorder Search, Part 2
There are only a few companies that make camcorders these days. I’ve used Canon and Panasonic, and I have only passing use of JVC or Sony camcorders.
A near clone of the HV30 is Sony’s HDR-HC9. Sony has been competing head-to-head with Canon for this HD prosumer market for a couple of years—the HC9 is the successor to the HC7 just as the HV30 is to the HV20. The Sony and Canon camcorders look so similar you need to see the manufacturer’s logo to figure out which one is which--both Sony and Canon made this year’s camcorder in black after making both predecessors in grey last year. I smell corporate espionage….
The first place I went to for research for all the camcorders was http://www.camcorderinfo.com/. This page offers thorough reviews of all major features, and it tests the important stuff—how well the camcorder processes image, colour, etc. In the HC9 review, it compares the HC9 to the HV30, giving the Sony the edge for durability and ease of operation, but gives the Canon the thumbs up for performance and features. I’m prepared to sacrifice ease of operation for performance and features, particularly 30p, so at this point, I was leaning towards the HV30.
Camcorderinfo.com pointed me towards the current JVC and Panasonic models, so I scanned through them to pick out the prosumer products in their lines. JVC doesn’t produce prosumer or even high-end consumer mini-DV camcorders anymore, so they’re out of the running.
The Panasonic model is the PV-GS500, successor to the popular GS400. Physically, it resembles the Sony and Canon models closely—the industry seems to have settled on a specific form factor for palmcorders after 30 years of development. The GS500 is a 3-chip CCD camera, as opposed to a CMOS like the other two, and it has a real live focus ring instead of a sliding switch of some sort (the GS500 has a sliding switch for the zoom, though), although the ring is not marked to indicate settings. In terms of performance, the GS500 does well in various lighting conditions, and the full range of manual settings makes it a compelling option.
I’ve decided to seek out the HV30, the HC9, and the GS500 in retail showrooms to play with them as well as searching the web for more reviews (and prices!).
Next week, the decision-making process.
A near clone of the HV30 is Sony’s HDR-HC9. Sony has been competing head-to-head with Canon for this HD prosumer market for a couple of years—the HC9 is the successor to the HC7 just as the HV30 is to the HV20. The Sony and Canon camcorders look so similar you need to see the manufacturer’s logo to figure out which one is which--both Sony and Canon made this year’s camcorder in black after making both predecessors in grey last year. I smell corporate espionage….
The first place I went to for research for all the camcorders was http://www.camcorderinfo.com/. This page offers thorough reviews of all major features, and it tests the important stuff—how well the camcorder processes image, colour, etc. In the HC9 review, it compares the HC9 to the HV30, giving the Sony the edge for durability and ease of operation, but gives the Canon the thumbs up for performance and features. I’m prepared to sacrifice ease of operation for performance and features, particularly 30p, so at this point, I was leaning towards the HV30.
Camcorderinfo.com pointed me towards the current JVC and Panasonic models, so I scanned through them to pick out the prosumer products in their lines. JVC doesn’t produce prosumer or even high-end consumer mini-DV camcorders anymore, so they’re out of the running.
The Panasonic model is the PV-GS500, successor to the popular GS400. Physically, it resembles the Sony and Canon models closely—the industry seems to have settled on a specific form factor for palmcorders after 30 years of development. The GS500 is a 3-chip CCD camera, as opposed to a CMOS like the other two, and it has a real live focus ring instead of a sliding switch of some sort (the GS500 has a sliding switch for the zoom, though), although the ring is not marked to indicate settings. In terms of performance, the GS500 does well in various lighting conditions, and the full range of manual settings makes it a compelling option.
I’ve decided to seek out the HV30, the HC9, and the GS500 in retail showrooms to play with them as well as searching the web for more reviews (and prices!).
Next week, the decision-making process.
Wednesday, October 15, 2008
The New Camcorder Search, Part 1
My needs for a new camcorder are simple: I need mini-DV so that I can recapture stuff I’ve already shot, and I want to continue to use mini-DV tapes as that format still offers less compression than consumer-grade hard drive and DVD-burning camcorders.
The leader of the camcorder pack, out of the gates, is the Canon HV30. This is the successor model to the HV20, the camcorder that brought great excitement and joy to the indie filmmaking scene when it came out in 2007. The HV20 offered, for the first time, a decent HDV camera for less than $1000 USD. The HV30 ups the ante by offering 30p as well as the two formats the HV20 offered (24p and 1080i).
I wasn’t aware of what a CMOS camcorder was prior to the HV20’s arrival, but the image quality is high enough to offer HD capability, something I haven’t worked with yet.
Naturally, the first question is whether or not the HV30 will work with my Mac. I have a 1.6 GHz G5 equipped with Mac OS 10.4 (Tiger) and Final Cut Studio 1, and I don’t anticipate upgrading to anything any time soon. My Mac had no problems capturing 24p shot from Panasonic DVX100 and DVX100A cameras we’ve used, so the next step is to see if FCS 1 can cope with whatever pull-down process the HV30 uses for 24p.
The HV30 comes with a Firewire-400 (IEEE 1394) port (as well as USB-2, HDMI, and component video, and composite video ports), so it’s not a problem getting the signal from the camcorder to the computer. The question is, of course, whether or not the computer and the camcorder speak the same language.
Next time, the other camcorders in the running.
The leader of the camcorder pack, out of the gates, is the Canon HV30. This is the successor model to the HV20, the camcorder that brought great excitement and joy to the indie filmmaking scene when it came out in 2007. The HV20 offered, for the first time, a decent HDV camera for less than $1000 USD. The HV30 ups the ante by offering 30p as well as the two formats the HV20 offered (24p and 1080i).
I wasn’t aware of what a CMOS camcorder was prior to the HV20’s arrival, but the image quality is high enough to offer HD capability, something I haven’t worked with yet.
Naturally, the first question is whether or not the HV30 will work with my Mac. I have a 1.6 GHz G5 equipped with Mac OS 10.4 (Tiger) and Final Cut Studio 1, and I don’t anticipate upgrading to anything any time soon. My Mac had no problems capturing 24p shot from Panasonic DVX100 and DVX100A cameras we’ve used, so the next step is to see if FCS 1 can cope with whatever pull-down process the HV30 uses for 24p.
The HV30 comes with a Firewire-400 (IEEE 1394) port (as well as USB-2, HDMI, and component video, and composite video ports), so it’s not a problem getting the signal from the camcorder to the computer. The question is, of course, whether or not the computer and the camcorder speak the same language.
Next time, the other camcorders in the running.
Monday, October 6, 2008
Requiem for a Camcorder
In the spring of 2000, I bought my first camcorder, the Canon Ultura. It was one of the early consumer-grade mini-DV, all-digital camcorders, and it was great—I remember being amazed by how vivid digital video looked compared to the graininess that I’d come to expect from analog video camcorders.
The Ultura was a great camcorder, enabling me to shoot my UK vacation that summer, and then allowing me to start shooting Miller & Mullet and other stuff. The Ultura also served as my capture and export deck for a series of Macs and Mac OS’s, and it never let me down. Until, that is, this summer while I was trying to capture footage for a short my friend Jeff had shot. After 8 years of regular (and sometimes heavy) use, the Ultura’s playback head is kaput. Not even my trusty head-cleaning tape could fix the problem.
I paid $1500 CAD, plus tax, in early 2000, which was a typical price for a camcorder back then. I remember looking at various cameras, including Sony and Panasonic, before picking the Ultura from Japan Camera at the Eaton Centre.
The Ultura is a single-chip camera, but it was a better camera than most that year. Canon had actually put in a better lens in it, much better than the ones used in their ZR-series and Elura camcorders that followed. The Firewire connection worked perfectly, as did the tape mechanism, and I never had to take it for repairs, despite the abuse it received, including shooting a feature during an incredibly hot and humid Toronto summer, capturing the footage from that feature (on nearly 30 mini-DV tapes)….
Canon withdrew the Ultura after a year in production, and I remember the replacement models weren’t of the same quality. Sure they were samller and had more buttons, but the quality wasn’t there (I’m basing my opinion on what I saw in various camera store showrooms).
I tricked the Ultura out with cheap Cokin filters (the key filters being the neutral density and circular polarizer, but I also bought 2 grades of orange for counterbalancing the ND filter, and a blue filter that I never got around to using for day-for-night shooting), so for outdoor shooting, the Ultura did a great job. Indoors, footage tended to be grainy if it wasn’t in a horribly bright room. I tried to go manual as much as possible for colour balance and exposure as the automatic controls tended to over-react to any change in lighting levels. Overall, though, I learned how to avoid the Ultura’s limitations, and I think the resulting video looked better than most one-chip productions did.
The most annoying aspect of the Ultura, though, was the audio jack. I curse whoever decided that a ⅛” plug was a better option than XLR or even 1/4 “…. The transformer I bought to convert XLR to the ⅛” worked great, but eventually you had to find the sweet spot where the plug and jack were both in full contact and the audio was actually reaching the recording head (I went through a series of cheap headphones dedicated to ensuring the audio was making it to two channels at the same time).
So… after spending several hours over a couple of nights trying to capture and recapture Jeff’s footage, I realized my beloved Ultura had reached the end of its working life and was now destined to sit as a memento on my bookcase rather than actually shoot anything.
Next time, part one of my search for a replacement.
The Ultura was a great camcorder, enabling me to shoot my UK vacation that summer, and then allowing me to start shooting Miller & Mullet and other stuff. The Ultura also served as my capture and export deck for a series of Macs and Mac OS’s, and it never let me down. Until, that is, this summer while I was trying to capture footage for a short my friend Jeff had shot. After 8 years of regular (and sometimes heavy) use, the Ultura’s playback head is kaput. Not even my trusty head-cleaning tape could fix the problem.
I paid $1500 CAD, plus tax, in early 2000, which was a typical price for a camcorder back then. I remember looking at various cameras, including Sony and Panasonic, before picking the Ultura from Japan Camera at the Eaton Centre.
The Ultura is a single-chip camera, but it was a better camera than most that year. Canon had actually put in a better lens in it, much better than the ones used in their ZR-series and Elura camcorders that followed. The Firewire connection worked perfectly, as did the tape mechanism, and I never had to take it for repairs, despite the abuse it received, including shooting a feature during an incredibly hot and humid Toronto summer, capturing the footage from that feature (on nearly 30 mini-DV tapes)….
Canon withdrew the Ultura after a year in production, and I remember the replacement models weren’t of the same quality. Sure they were samller and had more buttons, but the quality wasn’t there (I’m basing my opinion on what I saw in various camera store showrooms).
I tricked the Ultura out with cheap Cokin filters (the key filters being the neutral density and circular polarizer, but I also bought 2 grades of orange for counterbalancing the ND filter, and a blue filter that I never got around to using for day-for-night shooting), so for outdoor shooting, the Ultura did a great job. Indoors, footage tended to be grainy if it wasn’t in a horribly bright room. I tried to go manual as much as possible for colour balance and exposure as the automatic controls tended to over-react to any change in lighting levels. Overall, though, I learned how to avoid the Ultura’s limitations, and I think the resulting video looked better than most one-chip productions did.
The most annoying aspect of the Ultura, though, was the audio jack. I curse whoever decided that a ⅛” plug was a better option than XLR or even 1/4 “…. The transformer I bought to convert XLR to the ⅛” worked great, but eventually you had to find the sweet spot where the plug and jack were both in full contact and the audio was actually reaching the recording head (I went through a series of cheap headphones dedicated to ensuring the audio was making it to two channels at the same time).
So… after spending several hours over a couple of nights trying to capture and recapture Jeff’s footage, I realized my beloved Ultura had reached the end of its working life and was now destined to sit as a memento on my bookcase rather than actually shoot anything.
Next time, part one of my search for a replacement.
Wednesday, September 24, 2008
Burn After Laughing
I saw the Coen Brothers’ Burn After Reading this weekend, and it’s definitely a lot funnier than No Country for Old Men.
Spoilers lurk after this point, so if you haven’t seen the movie, stop here. It’s a fun movie best enjoyed without preconceived notions.
It’s definitely one of the Coens’ funnier movies, with Brad Pitt, Frances McDormand, and Richard Jenkins playing the dumbest characters I’ve seen them do. These three talented actors play gym employees who fumble their way into the Coens’ whacky thriller, and, for me, half the fun is seeing how these smart people play clueless people. Pitt in particular is hilarious with his remarkable gym trainer Chad.
The Coens contrast these three clueless characters with smart characters—Tilda Swindon and John Malkovich play intelligent upper-middle-class characters whose crumbling marriage gets the plot rolling, with Tilda’s Katie having an affair with Treasury agent Harry, played with twitchy energy by George Clooney.
Clooney’s character is what fascinates me the most after my first viewing of the movie, with one scene in particular resonating days afterwards.
I realized I had, while watching, divided the characters into 2 groups, the smart ones and the dumb ones, since the Coens had kept the 2 groups separated into those groupings for much of the first act. I assumed that Clooney’s character, as twitchy and as jogging-obsessed as he is, was one of the smart ones.
Harry, while having an affair with Katie, is also married to a successful children’s book author (Sandy, played by Elizabeth Marvel) and trolls internet dating sites for flings, including McDormand’s Linda. Despite being intimidated by Malkovich’s Osbourne at a dinner party, Harry seems bright enough to be involved with Katie, a doctor. He’s a philanderer, sure, and obsessed with “getting a run in,” but he blends in with the smart characters quite easily. The twitchiness is explained, early on, by his former job as a U.S. Marshal where he acted as a bodyguard, and by his current job as a Treasury agent—he’s in law enforcement, used to constantly monitoring his surroundings. He’s an older man for a field agent, so I had assumed he’d started taking the job home with him and constantly watched his surroundings even when not on the job (we never actually see Harry working).
But at one point in the movie, he reveals a secret project he’s building in his basement to Linda during his wife’s absence. We aren’t shown much of it prior to this scene: just some metal pipe purchased from a store, and some sort of complex metal hinge or mechanism as he works on it (he does, however, keep it locked up in a caged area within the basement, so I assumed it was something related to his job to require the extra security).
The Coens use the moment to not only reveal a great joke, but it also made me realize everything I’d assumed about Harry up to that point was wrong—he was as misguided as the gym trio. It’s a brilliant bit of writing. The thriller genre demands that information be given to the audience bit by bit as they solve the mystery, but the Coens apply this strategy to Clooney’s character (perhaps as a contrast to Pitt’s more obvious character, whose obliviousness is clear from the moment we watch him snap something in a customer’s body by accident).
With Linda at his side in his basement workshop, Harry unveils his device to her and to the audience, telling Linda that it’s a gift for his wife, Sandy. The machine has a seat on it, which Harry rolls back to activate a thrusting pink dildo. A beat later, after the comedic shock has worn off, you realize Harry has built this for his author wife, a woman who has appeared as intelligent and as cultured as Katie or Osbourne during the dinner party. Harry eagerly tells Linda he copied a machine he’d seen in a men’s magazine, building the device for a fraction of the cost. And he’s told her it’s a gift for his wife—he’s forgotten the lie that he and his wife have ended their relationship.
The character of Harry changed for me at that moment—he went from being the long-in-tooth law enforcement man to a sex-obsessed goof who has probably tormented his wife with inappropriate gifts and other whacky behaviour.
The scene doesn’t really advance the plot that much, but it’s not a throw-away gag inserted for laughs, despite the roar of laughter the pink dildo creates when it emerges over and over again from the black seat (a comic version of the alien chestburster from Alien maybe?). It is a clever, and hilarious, means of revealing Harry as a character, tweaking the audience’s expectations. From that moment forward, we realize Harry’s not as smart as he’d seemed to be, and that he isn’t the smooth philanderer we’d assumed he was—he’s a sex-crazed lunatic.
That scene allows the Coens to move Clooney’s character into buffoon county quite easily—in scenes following, he shoots someone in a reflexive moment (followed by a mad panic) and becomes increasingly paranoid as the plot rolls along. His wife, revealed in the scene to likely be long-suffering based on what he considers a gift to her, is on a book tour where she is having an affair of her own with someone presumably smarter than Harry.
The critics are calling Burn After Reading a minor Coen movie, but that scene proves to me that they are still master writers and filmmakers.
Spoilers lurk after this point, so if you haven’t seen the movie, stop here. It’s a fun movie best enjoyed without preconceived notions.
It’s definitely one of the Coens’ funnier movies, with Brad Pitt, Frances McDormand, and Richard Jenkins playing the dumbest characters I’ve seen them do. These three talented actors play gym employees who fumble their way into the Coens’ whacky thriller, and, for me, half the fun is seeing how these smart people play clueless people. Pitt in particular is hilarious with his remarkable gym trainer Chad.
The Coens contrast these three clueless characters with smart characters—Tilda Swindon and John Malkovich play intelligent upper-middle-class characters whose crumbling marriage gets the plot rolling, with Tilda’s Katie having an affair with Treasury agent Harry, played with twitchy energy by George Clooney.
Clooney’s character is what fascinates me the most after my first viewing of the movie, with one scene in particular resonating days afterwards.
I realized I had, while watching, divided the characters into 2 groups, the smart ones and the dumb ones, since the Coens had kept the 2 groups separated into those groupings for much of the first act. I assumed that Clooney’s character, as twitchy and as jogging-obsessed as he is, was one of the smart ones.
Harry, while having an affair with Katie, is also married to a successful children’s book author (Sandy, played by Elizabeth Marvel) and trolls internet dating sites for flings, including McDormand’s Linda. Despite being intimidated by Malkovich’s Osbourne at a dinner party, Harry seems bright enough to be involved with Katie, a doctor. He’s a philanderer, sure, and obsessed with “getting a run in,” but he blends in with the smart characters quite easily. The twitchiness is explained, early on, by his former job as a U.S. Marshal where he acted as a bodyguard, and by his current job as a Treasury agent—he’s in law enforcement, used to constantly monitoring his surroundings. He’s an older man for a field agent, so I had assumed he’d started taking the job home with him and constantly watched his surroundings even when not on the job (we never actually see Harry working).
But at one point in the movie, he reveals a secret project he’s building in his basement to Linda during his wife’s absence. We aren’t shown much of it prior to this scene: just some metal pipe purchased from a store, and some sort of complex metal hinge or mechanism as he works on it (he does, however, keep it locked up in a caged area within the basement, so I assumed it was something related to his job to require the extra security).
The Coens use the moment to not only reveal a great joke, but it also made me realize everything I’d assumed about Harry up to that point was wrong—he was as misguided as the gym trio. It’s a brilliant bit of writing. The thriller genre demands that information be given to the audience bit by bit as they solve the mystery, but the Coens apply this strategy to Clooney’s character (perhaps as a contrast to Pitt’s more obvious character, whose obliviousness is clear from the moment we watch him snap something in a customer’s body by accident).
With Linda at his side in his basement workshop, Harry unveils his device to her and to the audience, telling Linda that it’s a gift for his wife, Sandy. The machine has a seat on it, which Harry rolls back to activate a thrusting pink dildo. A beat later, after the comedic shock has worn off, you realize Harry has built this for his author wife, a woman who has appeared as intelligent and as cultured as Katie or Osbourne during the dinner party. Harry eagerly tells Linda he copied a machine he’d seen in a men’s magazine, building the device for a fraction of the cost. And he’s told her it’s a gift for his wife—he’s forgotten the lie that he and his wife have ended their relationship.
The character of Harry changed for me at that moment—he went from being the long-in-tooth law enforcement man to a sex-obsessed goof who has probably tormented his wife with inappropriate gifts and other whacky behaviour.
The scene doesn’t really advance the plot that much, but it’s not a throw-away gag inserted for laughs, despite the roar of laughter the pink dildo creates when it emerges over and over again from the black seat (a comic version of the alien chestburster from Alien maybe?). It is a clever, and hilarious, means of revealing Harry as a character, tweaking the audience’s expectations. From that moment forward, we realize Harry’s not as smart as he’d seemed to be, and that he isn’t the smooth philanderer we’d assumed he was—he’s a sex-crazed lunatic.
That scene allows the Coens to move Clooney’s character into buffoon county quite easily—in scenes following, he shoots someone in a reflexive moment (followed by a mad panic) and becomes increasingly paranoid as the plot rolls along. His wife, revealed in the scene to likely be long-suffering based on what he considers a gift to her, is on a book tour where she is having an affair of her own with someone presumably smarter than Harry.
The critics are calling Burn After Reading a minor Coen movie, but that scene proves to me that they are still master writers and filmmakers.
Thursday, August 14, 2008
Knight is Darkest before the Dawn
It took me a few weeks, but I finally saw The Dark Knight, the Batman blockbuster that’s brought in nearly $450 million USD since its release.
I’m not a big comicbook guy (my collection is less than 20 books, all of them ungraded cheapies, which is peanuts by most collectors’ standards), so I can’t tell you which comic the movie was based on or what was left out, added, etc., but it is one kick-ass movie. The Dark Knight transcends the action and superhero genres—it is a dark, gritty tale with the lead character leading a double life, all the while grappling with the slippery moral slope of a vigilante, officially wanted by police, who fights violent crime with violence.
This Batman is as far from the campy Adam West Batman as you can get.
I liked the first Batman movie when it came out as it was the best superhero movie I’d seen up until that point. Michael Keaton’s portrayal of Batman and a sleepy-eyed, distracted Bruce Wayne were well done. But the subsequent Batman series of movies, increasingly camp and more about spectacle than the story of a disturbed man, treated the world of comicbooks as a childish fantasy. The movies were safe, touching on the troubled psyche of Bruce Wayne, but the filmmakers kept their hands clean.
This new Batman movie not only touches on the troubled psyche, it envelopes itself in it. Violence is not camped up—the cause and effect of explosions, blades, and bullets is shown, the victims display the shock and grief those things create in the real world.
Much attention has been paid to Heath Ledger’s Joker, his final performance before his drug overdose. Ledger’s Joker is breathtakingly evil, profane and funny, and one of the best portrayals of a sociopath I’ve seen. He enjoys mayhem for its own sake, so he not only messes with Batman and the Gotham Police, he takes on organized crime, all for the fun of it. Ledger’s Joker is a perfect counterpoint to Bales’s Batman—each is compelled to do what they do for reasons they may not understand (but Bruce Wayne is more self-aware and troubled by the path he has chosen).
The story of Dark Knight is very well done. For a 152-minute movie, there are no gaps or moments where I fell out of the story or got impatient for a scene to finish. And the plot twists were worthy of a first-rate mystery story, with the Joker’s schemes subtle enough that they weren’t obvious like most Hollywood on-screen schemes are. The audience realized the tricks at the same time as the characters, not minutes (or even hours) before. The screenwriters treated their audience’s intelligence with respect and assumed the average viewer would be intelligent enough to understand everything as it happened.
The pacing of the movie is relentless and, coupled with the performances and the story, makes for a very good 152 minutes.
After seeing the movie, I realized that the Batman franchise has updated itself to our times just as the James Bond franchise has done. In our post-9/11 world, violence and disasters have become real, random, and heartbreaking. Dark Knight, like Casino Royale did, reinvents a sometimes cartoonish character for today’s audience.
I’m not a big comicbook guy (my collection is less than 20 books, all of them ungraded cheapies, which is peanuts by most collectors’ standards), so I can’t tell you which comic the movie was based on or what was left out, added, etc., but it is one kick-ass movie. The Dark Knight transcends the action and superhero genres—it is a dark, gritty tale with the lead character leading a double life, all the while grappling with the slippery moral slope of a vigilante, officially wanted by police, who fights violent crime with violence.
This Batman is as far from the campy Adam West Batman as you can get.
I liked the first Batman movie when it came out as it was the best superhero movie I’d seen up until that point. Michael Keaton’s portrayal of Batman and a sleepy-eyed, distracted Bruce Wayne were well done. But the subsequent Batman series of movies, increasingly camp and more about spectacle than the story of a disturbed man, treated the world of comicbooks as a childish fantasy. The movies were safe, touching on the troubled psyche of Bruce Wayne, but the filmmakers kept their hands clean.
This new Batman movie not only touches on the troubled psyche, it envelopes itself in it. Violence is not camped up—the cause and effect of explosions, blades, and bullets is shown, the victims display the shock and grief those things create in the real world.
Much attention has been paid to Heath Ledger’s Joker, his final performance before his drug overdose. Ledger’s Joker is breathtakingly evil, profane and funny, and one of the best portrayals of a sociopath I’ve seen. He enjoys mayhem for its own sake, so he not only messes with Batman and the Gotham Police, he takes on organized crime, all for the fun of it. Ledger’s Joker is a perfect counterpoint to Bales’s Batman—each is compelled to do what they do for reasons they may not understand (but Bruce Wayne is more self-aware and troubled by the path he has chosen).
The story of Dark Knight is very well done. For a 152-minute movie, there are no gaps or moments where I fell out of the story or got impatient for a scene to finish. And the plot twists were worthy of a first-rate mystery story, with the Joker’s schemes subtle enough that they weren’t obvious like most Hollywood on-screen schemes are. The audience realized the tricks at the same time as the characters, not minutes (or even hours) before. The screenwriters treated their audience’s intelligence with respect and assumed the average viewer would be intelligent enough to understand everything as it happened.
The pacing of the movie is relentless and, coupled with the performances and the story, makes for a very good 152 minutes.
After seeing the movie, I realized that the Batman franchise has updated itself to our times just as the James Bond franchise has done. In our post-9/11 world, violence and disasters have become real, random, and heartbreaking. Dark Knight, like Casino Royale did, reinvents a sometimes cartoonish character for today’s audience.
Tuesday, July 22, 2008
Web Video
Over the last few weeks, Mullet and I have been spending a lot of time discussing web video, and I realized haven’t written about it here very much.
When I started buying video gear seven years ago, the 3 major players in web video were QuickTime, Real Player, and Windows Media Player. All three played a range of codecs, but there weren’t easy ways of moving between the three formats. Being a Mac user, I used QuickTime by default, but I did have the other two players on my computer.
The players were all clunky and finicky. It wasn’t uncommon to see reduced frame-rates, lowered resolution, and even minimal action to make things look better.
Back then, I didn’t have a website or even an internet connection. The main means of delivering video was by running the signal from my capture card to my VCR. VHS was king—everyone, amateur or professional, used tape.
When I upgraded and got my G4, I suddenly had a DVD-R burner, and that led me to supplement Final Cut Pro with DVD Studio Pro (a couple months later, the Final Cut Studio bundle came out at a lower price than what it cost me to buy FCP and DVD-SP separately—thanks, Apple!).
Thus equipped, in 2003 I made history at the late, great Second Ciné video show by being the first to submit a video on DVD. But it was still a VHS world, and I backed up that DVD by exporting my clips to my VCR.
When I traded in my G4 for my G5, the new PCI expansion slot arrangement rendered my capture card useless, so I dropped the VHS option completely. By then, DVD burners were cheap enough that the indie world had shifted away from VHS.
DVD seemed to be the new king, unbeatable with its portability and flexibility. You could play it on your TV with a regular DVD player, or you could put it in a DVD-equipped computer. DVD sprouted in rental stores and retailers, offering special features and all the things impossible on VHS (subtitles and audio tracks in different languages, commentary tracks, alternate endings, etc, etc). The disks didn’t wear out like all tape-based technologies do—with care and handling, you would see the same image quality on the 1000th play as you would on the first play.
For an indie producer, you could easily crank out a DVD (maybe not the DVD-9 dual-layer format, but something that worked in most players and nearly all computers) that looked and played the same as the big boys’ disks.
I bought the 3rd edition of Chris Gore’s excellent film festival book in 2005, and we started to base our video efforts on the advice given. Film festivals were still king, and most of the ones that encouraged indie contributions readily accepted all the digital formats.
I bought Gore’s follow-up book on producing indie DVDs and used it as the main guide for our first appearance at the San Diego Comicon in 2006.
But it was at San Diego that I saw the future, and its name was not DVD but web video.
The big 3 players were still in the game, but Apple had introduced a new wrinkle—the iPod and iTunes. With incredible ease, you could download podcasts and listen to them on your Mac or iPod. The arrival of video-capable iPods sparked video podcasting. Flash video had arrived in force, with the help of some serious web video sites like YouTube. The big three media players changed membership, with Real player becoming a distant fourth. In fact, by 2006, I didn’t even have Real installed on my G5 as nobody was putting out video that QuickTime or WMP wouldn’t handle.
Gore and Mark Bell from Film Threat hosted a couple of panels at the con’s film festival (where my costumed appearance got some nasty looks from the black-clad filmistas—clearly a line is drawn in some people’s minds between the film fest and the convention itself!), and I attended a couple of them.
In one panel, Gore and Bell introduced the two guys behind Ask a Ninja as well as a couple of people from Hope is Emo, two of the most popular podcasts. I was still sans-internet at home, so I wasn’t aware of how big podcasting and web video had become. More people were watching these online videos than hundreds of film festivals put together.
But the indie aspect of these productions—Ninja was shot in the star’s apartment (painted up for green-screen production)—made it clear that you didn’t need a lot of money, just enough technology and, of course, a good idea well executed, to build an audience.
DVD suddenly looked less essential, just like VHS. Apple introduced its TV interface, and with flatscreen TVs and computer monitors becoming essentially the same, the average consumer realized they didn’t need a disk or tape to watch movies, TV shows, and indie video. The messy blue laser fight didn’t help, with the traditional market split into 3 different camps—DVD loyalists, Blu-Ray, and HD-DVD. Even with HD-DVD losing the fight, most people I know aren’t rushing into the blue laser world. After seeing CDs largely replaced by web music, most people are expecting the same of video.
So… in the 9 years I have been dabbling with indie video, I have seen it change completely. A physical product is no longer the primary goal since you can find a larger audience thorugh the magic of internet pixels.
Mullet and I are prepping our old feature, Babysitters, for web in small chapters. Our long-in-development DVD project is now a web video project with a DVD version also available. We’ll follow the footsteps of successful web video people like Rob Schrab or the guys behind Chad Vader and put the videos online and make a full-quality DVD available for sale.
More on web video to come. After all, it’s Tuesday. There’ll probably be some new development on Wednesday….
When I started buying video gear seven years ago, the 3 major players in web video were QuickTime, Real Player, and Windows Media Player. All three played a range of codecs, but there weren’t easy ways of moving between the three formats. Being a Mac user, I used QuickTime by default, but I did have the other two players on my computer.
The players were all clunky and finicky. It wasn’t uncommon to see reduced frame-rates, lowered resolution, and even minimal action to make things look better.
Back then, I didn’t have a website or even an internet connection. The main means of delivering video was by running the signal from my capture card to my VCR. VHS was king—everyone, amateur or professional, used tape.
When I upgraded and got my G4, I suddenly had a DVD-R burner, and that led me to supplement Final Cut Pro with DVD Studio Pro (a couple months later, the Final Cut Studio bundle came out at a lower price than what it cost me to buy FCP and DVD-SP separately—thanks, Apple!).
Thus equipped, in 2003 I made history at the late, great Second Ciné video show by being the first to submit a video on DVD. But it was still a VHS world, and I backed up that DVD by exporting my clips to my VCR.
When I traded in my G4 for my G5, the new PCI expansion slot arrangement rendered my capture card useless, so I dropped the VHS option completely. By then, DVD burners were cheap enough that the indie world had shifted away from VHS.
DVD seemed to be the new king, unbeatable with its portability and flexibility. You could play it on your TV with a regular DVD player, or you could put it in a DVD-equipped computer. DVD sprouted in rental stores and retailers, offering special features and all the things impossible on VHS (subtitles and audio tracks in different languages, commentary tracks, alternate endings, etc, etc). The disks didn’t wear out like all tape-based technologies do—with care and handling, you would see the same image quality on the 1000th play as you would on the first play.
For an indie producer, you could easily crank out a DVD (maybe not the DVD-9 dual-layer format, but something that worked in most players and nearly all computers) that looked and played the same as the big boys’ disks.
I bought the 3rd edition of Chris Gore’s excellent film festival book in 2005, and we started to base our video efforts on the advice given. Film festivals were still king, and most of the ones that encouraged indie contributions readily accepted all the digital formats.
I bought Gore’s follow-up book on producing indie DVDs and used it as the main guide for our first appearance at the San Diego Comicon in 2006.
But it was at San Diego that I saw the future, and its name was not DVD but web video.
The big 3 players were still in the game, but Apple had introduced a new wrinkle—the iPod and iTunes. With incredible ease, you could download podcasts and listen to them on your Mac or iPod. The arrival of video-capable iPods sparked video podcasting. Flash video had arrived in force, with the help of some serious web video sites like YouTube. The big three media players changed membership, with Real player becoming a distant fourth. In fact, by 2006, I didn’t even have Real installed on my G5 as nobody was putting out video that QuickTime or WMP wouldn’t handle.
Gore and Mark Bell from Film Threat hosted a couple of panels at the con’s film festival (where my costumed appearance got some nasty looks from the black-clad filmistas—clearly a line is drawn in some people’s minds between the film fest and the convention itself!), and I attended a couple of them.
In one panel, Gore and Bell introduced the two guys behind Ask a Ninja as well as a couple of people from Hope is Emo, two of the most popular podcasts. I was still sans-internet at home, so I wasn’t aware of how big podcasting and web video had become. More people were watching these online videos than hundreds of film festivals put together.
But the indie aspect of these productions—Ninja was shot in the star’s apartment (painted up for green-screen production)—made it clear that you didn’t need a lot of money, just enough technology and, of course, a good idea well executed, to build an audience.
DVD suddenly looked less essential, just like VHS. Apple introduced its TV interface, and with flatscreen TVs and computer monitors becoming essentially the same, the average consumer realized they didn’t need a disk or tape to watch movies, TV shows, and indie video. The messy blue laser fight didn’t help, with the traditional market split into 3 different camps—DVD loyalists, Blu-Ray, and HD-DVD. Even with HD-DVD losing the fight, most people I know aren’t rushing into the blue laser world. After seeing CDs largely replaced by web music, most people are expecting the same of video.
So… in the 9 years I have been dabbling with indie video, I have seen it change completely. A physical product is no longer the primary goal since you can find a larger audience thorugh the magic of internet pixels.
Mullet and I are prepping our old feature, Babysitters, for web in small chapters. Our long-in-development DVD project is now a web video project with a DVD version also available. We’ll follow the footsteps of successful web video people like Rob Schrab or the guys behind Chad Vader and put the videos online and make a full-quality DVD available for sale.
More on web video to come. After all, it’s Tuesday. There’ll probably be some new development on Wednesday….
Tuesday, July 1, 2008
Happy Canada Day, Happy Independence Day
Happy Canada Day to everyone north of the border, and for those of you (all the millions who read this blog) south of the border, happy Independence Day.
I hope everyone has a safe and happy holiday.
I hope everyone has a safe and happy holiday.
Thursday, June 26, 2008
Thank you, Ed & Red’s Night Party
Ed & Red’s Night Party will go off the air in August. The new owners of CITY-TV here in Toronto are ridding the station of everything that made it unique in Toronto: Speaker’s Corner, Ed the Sock….
This is a shame—CITY was the fun station, sometimes annoyingly pretentious like Queen West can be, but never boring or entirely predictable like its buttoned-down, blandly corporate competitors.
Ed the Sock started out on the cable access channel with the nefarious Rogers Cable in 1992. Stars on press junkets through Toronto started to stop by a talk show hosted by a puppet who pulled no punches. I never saw the show on cable as I was still an over-the-airwaves viewer, but I knew about it by way of the media and friends who did have access to it.
A mere two years later, the Sock got called up to the big leagues at CITY. The show was a must-see on Friday nights. There were a few sidekicks along for the ride (Humble Howard of CFNY being the first one at CITY, and Craig Campbell in either the 3rd or 4th season). But as talented as they were, the Sock was still the main draw as he insulted guests, the show, the audience….
Ed’s Night Party was, for a long time, the only night time talk show in Toronto and Ontario (probably Canada, too).
The leading national networks, CBC and CTV, both launched high-profile, late night talk shows, the CBC doing a weekly show and CTV doing 5-nights a week. Both efforts were clones of the big US shows, down to the placement of the desk and the guest chairs (with the requisite funny musical director and the house band to one side, of course). Both were entertaining in their own way, but they broke no new ground and both efforts eventually left the air after ratings slipped away due to boredom.
But the Sock was refreshingly original. You never knew what was going to happen on the show next, something that even Letterman couldn’t claim. You couldn’t jump into the middle of the show and know exactly where the show was (opening monologue/comedy bit/first guest… they’re still following this calcified format).
After turning into a day-job wage slave, my nights began to end earlier and earlier, and I stopped watching Ed the Sock, Letterman and the rest at some point. Heck, I even stopped watching Saturday Night Live and missed that whole Tina Fey revival. I didn’t start watching Ed the Sock again until we met Ed and Red at a comic-con here in Toronto.
Ed & Red’s had evolved into a different show from the what I’d watched the first 3 years he was on CITY—the interviews were usually done in the field, and the bikini quota went way up. The comedy remained edgy, however, and Ed & Red are tremendous improvisers, ranging from groan-out-loud puns to edgy barbs aimed at society’s sacred cows. The show self-mockingly went for the young male demographic with spring break footage of wet t-shirt and bikini contests, topless hot tub girls, and some of the dirtiest jokes ever told on Canadian TV.
The show is less predictable in this late incarnation, breaking away from the monologue-sketch-guest-guest-guest format that has solidified the genre into an indistinguishable ritual—only the host, the set dressing, and onscreen graphics distinguish the big American shows (Jimmy Kimmel providing a breath of fresh air but not as popular as a result). Ed the Sock, meanwhile, marching to his own drummer , made his cast of dancers, tub girls, DJs, and his co-host Red into a complete repertory company capable of doing anything.
I hope we haven’t seen the last of Ed the Sock, but I do know that Ed and Red will do well in their next step, whatever form that takes.
CITY-TV, meanwhile, won’t be the same with all the fun tossed out like yesterday’s garbage. I fear the one station that embraced the great city of Toronto will become another bland corporate entity, indistinguishable from the safe, generic, predictable dullness of the other Toronto stations.
Maybe it’s better that the Sock is now free of the new CITY—it would be sad to see him sanitized into something he is not.
This is a shame—CITY was the fun station, sometimes annoyingly pretentious like Queen West can be, but never boring or entirely predictable like its buttoned-down, blandly corporate competitors.
Ed the Sock started out on the cable access channel with the nefarious Rogers Cable in 1992. Stars on press junkets through Toronto started to stop by a talk show hosted by a puppet who pulled no punches. I never saw the show on cable as I was still an over-the-airwaves viewer, but I knew about it by way of the media and friends who did have access to it.
A mere two years later, the Sock got called up to the big leagues at CITY. The show was a must-see on Friday nights. There were a few sidekicks along for the ride (Humble Howard of CFNY being the first one at CITY, and Craig Campbell in either the 3rd or 4th season). But as talented as they were, the Sock was still the main draw as he insulted guests, the show, the audience….
Ed’s Night Party was, for a long time, the only night time talk show in Toronto and Ontario (probably Canada, too).
The leading national networks, CBC and CTV, both launched high-profile, late night talk shows, the CBC doing a weekly show and CTV doing 5-nights a week. Both efforts were clones of the big US shows, down to the placement of the desk and the guest chairs (with the requisite funny musical director and the house band to one side, of course). Both were entertaining in their own way, but they broke no new ground and both efforts eventually left the air after ratings slipped away due to boredom.
But the Sock was refreshingly original. You never knew what was going to happen on the show next, something that even Letterman couldn’t claim. You couldn’t jump into the middle of the show and know exactly where the show was (opening monologue/comedy bit/first guest… they’re still following this calcified format).
After turning into a day-job wage slave, my nights began to end earlier and earlier, and I stopped watching Ed the Sock, Letterman and the rest at some point. Heck, I even stopped watching Saturday Night Live and missed that whole Tina Fey revival. I didn’t start watching Ed the Sock again until we met Ed and Red at a comic-con here in Toronto.
Ed & Red’s had evolved into a different show from the what I’d watched the first 3 years he was on CITY—the interviews were usually done in the field, and the bikini quota went way up. The comedy remained edgy, however, and Ed & Red are tremendous improvisers, ranging from groan-out-loud puns to edgy barbs aimed at society’s sacred cows. The show self-mockingly went for the young male demographic with spring break footage of wet t-shirt and bikini contests, topless hot tub girls, and some of the dirtiest jokes ever told on Canadian TV.
The show is less predictable in this late incarnation, breaking away from the monologue-sketch-guest-guest-guest format that has solidified the genre into an indistinguishable ritual—only the host, the set dressing, and onscreen graphics distinguish the big American shows (Jimmy Kimmel providing a breath of fresh air but not as popular as a result). Ed the Sock, meanwhile, marching to his own drummer , made his cast of dancers, tub girls, DJs, and his co-host Red into a complete repertory company capable of doing anything.
I hope we haven’t seen the last of Ed the Sock, but I do know that Ed and Red will do well in their next step, whatever form that takes.
CITY-TV, meanwhile, won’t be the same with all the fun tossed out like yesterday’s garbage. I fear the one station that embraced the great city of Toronto will become another bland corporate entity, indistinguishable from the safe, generic, predictable dullness of the other Toronto stations.
Maybe it’s better that the Sock is now free of the new CITY—it would be sad to see him sanitized into something he is not.
Tuesday, June 10, 2008
Dance of the Sugar Plum Scaries

Our 3rd appearance on Ed & Red’s Night Party aired on Friday (June 6), with the repeat running on Sunday, June 8. As I wrote back on April 24, this was an appearance in a sketch rather than being guests plugging something on the show.
Should Ed & Red post the clip, I’ll link to it here as I think we did some of our best work so far on that sketch.
That leaves one more appearance yet to air. Our fourth appearance is just a cameo, and it should last a few seconds rather than minutes.
You’ll get a chance to meet Ed & Red, as well as Miller & Mullet, at the Paradise Toronto Comicon, which runs July 12-13 at the Holiday Inn on King. This show is dedicated to comic books, so if you’re a fan of sequential art, drop by and say hello.
Should Ed & Red post the clip, I’ll link to it here as I think we did some of our best work so far on that sketch.
That leaves one more appearance yet to air. Our fourth appearance is just a cameo, and it should last a few seconds rather than minutes.
You’ll get a chance to meet Ed & Red, as well as Miller & Mullet, at the Paradise Toronto Comicon, which runs July 12-13 at the Holiday Inn on King. This show is dedicated to comic books, so if you’re a fan of sequential art, drop by and say hello.
Subscribe to:
Posts (Atom)