In the spring of 2000, I bought my first camcorder, the Canon Ultura. It was one of the early consumer-grade mini-DV, all-digital camcorders, and it was great—I remember being amazed by how vivid digital video looked compared to the graininess that I’d come to expect from analog video camcorders.
The Ultura was a great camcorder, enabling me to shoot my UK vacation that summer, and then allowing me to start shooting Miller & Mullet and other stuff. The Ultura also served as my capture and export deck for a series of Macs and Mac OS’s, and it never let me down. Until, that is, this summer while I was trying to capture footage for a short my friend Jeff had shot. After 8 years of regular (and sometimes heavy) use, the Ultura’s playback head is kaput. Not even my trusty head-cleaning tape could fix the problem.
I paid $1500 CAD, plus tax, in early 2000, which was a typical price for a camcorder back then. I remember looking at various cameras, including Sony and Panasonic, before picking the Ultura from Japan Camera at the Eaton Centre.
The Ultura is a single-chip camera, but it was a better camera than most that year. Canon had actually put in a better lens in it, much better than the ones used in their ZR-series and Elura camcorders that followed. The Firewire connection worked perfectly, as did the tape mechanism, and I never had to take it for repairs, despite the abuse it received, including shooting a feature during an incredibly hot and humid Toronto summer, capturing the footage from that feature (on nearly 30 mini-DV tapes)….
Canon withdrew the Ultura after a year in production, and I remember the replacement models weren’t of the same quality. Sure they were samller and had more buttons, but the quality wasn’t there (I’m basing my opinion on what I saw in various camera store showrooms).
I tricked the Ultura out with cheap Cokin filters (the key filters being the neutral density and circular polarizer, but I also bought 2 grades of orange for counterbalancing the ND filter, and a blue filter that I never got around to using for day-for-night shooting), so for outdoor shooting, the Ultura did a great job. Indoors, footage tended to be grainy if it wasn’t in a horribly bright room. I tried to go manual as much as possible for colour balance and exposure as the automatic controls tended to over-react to any change in lighting levels. Overall, though, I learned how to avoid the Ultura’s limitations, and I think the resulting video looked better than most one-chip productions did.
The most annoying aspect of the Ultura, though, was the audio jack. I curse whoever decided that a ⅛” plug was a better option than XLR or even 1/4 “…. The transformer I bought to convert XLR to the ⅛” worked great, but eventually you had to find the sweet spot where the plug and jack were both in full contact and the audio was actually reaching the recording head (I went through a series of cheap headphones dedicated to ensuring the audio was making it to two channels at the same time).
So… after spending several hours over a couple of nights trying to capture and recapture Jeff’s footage, I realized my beloved Ultura had reached the end of its working life and was now destined to sit as a memento on my bookcase rather than actually shoot anything.
Next time, part one of my search for a replacement.
Showing posts with label post-production. Show all posts
Showing posts with label post-production. Show all posts
Monday, October 6, 2008


Tuesday, July 22, 2008
Web Video
Over the last few weeks, Mullet and I have been spending a lot of time discussing web video, and I realized haven’t written about it here very much.
When I started buying video gear seven years ago, the 3 major players in web video were QuickTime, Real Player, and Windows Media Player. All three played a range of codecs, but there weren’t easy ways of moving between the three formats. Being a Mac user, I used QuickTime by default, but I did have the other two players on my computer.
The players were all clunky and finicky. It wasn’t uncommon to see reduced frame-rates, lowered resolution, and even minimal action to make things look better.
Back then, I didn’t have a website or even an internet connection. The main means of delivering video was by running the signal from my capture card to my VCR. VHS was king—everyone, amateur or professional, used tape.
When I upgraded and got my G4, I suddenly had a DVD-R burner, and that led me to supplement Final Cut Pro with DVD Studio Pro (a couple months later, the Final Cut Studio bundle came out at a lower price than what it cost me to buy FCP and DVD-SP separately—thanks, Apple!).
Thus equipped, in 2003 I made history at the late, great Second Ciné video show by being the first to submit a video on DVD. But it was still a VHS world, and I backed up that DVD by exporting my clips to my VCR.
When I traded in my G4 for my G5, the new PCI expansion slot arrangement rendered my capture card useless, so I dropped the VHS option completely. By then, DVD burners were cheap enough that the indie world had shifted away from VHS.
DVD seemed to be the new king, unbeatable with its portability and flexibility. You could play it on your TV with a regular DVD player, or you could put it in a DVD-equipped computer. DVD sprouted in rental stores and retailers, offering special features and all the things impossible on VHS (subtitles and audio tracks in different languages, commentary tracks, alternate endings, etc, etc). The disks didn’t wear out like all tape-based technologies do—with care and handling, you would see the same image quality on the 1000th play as you would on the first play.
For an indie producer, you could easily crank out a DVD (maybe not the DVD-9 dual-layer format, but something that worked in most players and nearly all computers) that looked and played the same as the big boys’ disks.
I bought the 3rd edition of Chris Gore’s excellent film festival book in 2005, and we started to base our video efforts on the advice given. Film festivals were still king, and most of the ones that encouraged indie contributions readily accepted all the digital formats.
I bought Gore’s follow-up book on producing indie DVDs and used it as the main guide for our first appearance at the San Diego Comicon in 2006.
But it was at San Diego that I saw the future, and its name was not DVD but web video.
The big 3 players were still in the game, but Apple had introduced a new wrinkle—the iPod and iTunes. With incredible ease, you could download podcasts and listen to them on your Mac or iPod. The arrival of video-capable iPods sparked video podcasting. Flash video had arrived in force, with the help of some serious web video sites like YouTube. The big three media players changed membership, with Real player becoming a distant fourth. In fact, by 2006, I didn’t even have Real installed on my G5 as nobody was putting out video that QuickTime or WMP wouldn’t handle.
Gore and Mark Bell from Film Threat hosted a couple of panels at the con’s film festival (where my costumed appearance got some nasty looks from the black-clad filmistas—clearly a line is drawn in some people’s minds between the film fest and the convention itself!), and I attended a couple of them.
In one panel, Gore and Bell introduced the two guys behind Ask a Ninja as well as a couple of people from Hope is Emo, two of the most popular podcasts. I was still sans-internet at home, so I wasn’t aware of how big podcasting and web video had become. More people were watching these online videos than hundreds of film festivals put together.
But the indie aspect of these productions—Ninja was shot in the star’s apartment (painted up for green-screen production)—made it clear that you didn’t need a lot of money, just enough technology and, of course, a good idea well executed, to build an audience.
DVD suddenly looked less essential, just like VHS. Apple introduced its TV interface, and with flatscreen TVs and computer monitors becoming essentially the same, the average consumer realized they didn’t need a disk or tape to watch movies, TV shows, and indie video. The messy blue laser fight didn’t help, with the traditional market split into 3 different camps—DVD loyalists, Blu-Ray, and HD-DVD. Even with HD-DVD losing the fight, most people I know aren’t rushing into the blue laser world. After seeing CDs largely replaced by web music, most people are expecting the same of video.
So… in the 9 years I have been dabbling with indie video, I have seen it change completely. A physical product is no longer the primary goal since you can find a larger audience thorugh the magic of internet pixels.
Mullet and I are prepping our old feature, Babysitters, for web in small chapters. Our long-in-development DVD project is now a web video project with a DVD version also available. We’ll follow the footsteps of successful web video people like Rob Schrab or the guys behind Chad Vader and put the videos online and make a full-quality DVD available for sale.
More on web video to come. After all, it’s Tuesday. There’ll probably be some new development on Wednesday….
When I started buying video gear seven years ago, the 3 major players in web video were QuickTime, Real Player, and Windows Media Player. All three played a range of codecs, but there weren’t easy ways of moving between the three formats. Being a Mac user, I used QuickTime by default, but I did have the other two players on my computer.
The players were all clunky and finicky. It wasn’t uncommon to see reduced frame-rates, lowered resolution, and even minimal action to make things look better.
Back then, I didn’t have a website or even an internet connection. The main means of delivering video was by running the signal from my capture card to my VCR. VHS was king—everyone, amateur or professional, used tape.
When I upgraded and got my G4, I suddenly had a DVD-R burner, and that led me to supplement Final Cut Pro with DVD Studio Pro (a couple months later, the Final Cut Studio bundle came out at a lower price than what it cost me to buy FCP and DVD-SP separately—thanks, Apple!).
Thus equipped, in 2003 I made history at the late, great Second Ciné video show by being the first to submit a video on DVD. But it was still a VHS world, and I backed up that DVD by exporting my clips to my VCR.
When I traded in my G4 for my G5, the new PCI expansion slot arrangement rendered my capture card useless, so I dropped the VHS option completely. By then, DVD burners were cheap enough that the indie world had shifted away from VHS.
DVD seemed to be the new king, unbeatable with its portability and flexibility. You could play it on your TV with a regular DVD player, or you could put it in a DVD-equipped computer. DVD sprouted in rental stores and retailers, offering special features and all the things impossible on VHS (subtitles and audio tracks in different languages, commentary tracks, alternate endings, etc, etc). The disks didn’t wear out like all tape-based technologies do—with care and handling, you would see the same image quality on the 1000th play as you would on the first play.
For an indie producer, you could easily crank out a DVD (maybe not the DVD-9 dual-layer format, but something that worked in most players and nearly all computers) that looked and played the same as the big boys’ disks.
I bought the 3rd edition of Chris Gore’s excellent film festival book in 2005, and we started to base our video efforts on the advice given. Film festivals were still king, and most of the ones that encouraged indie contributions readily accepted all the digital formats.
I bought Gore’s follow-up book on producing indie DVDs and used it as the main guide for our first appearance at the San Diego Comicon in 2006.
But it was at San Diego that I saw the future, and its name was not DVD but web video.
The big 3 players were still in the game, but Apple had introduced a new wrinkle—the iPod and iTunes. With incredible ease, you could download podcasts and listen to them on your Mac or iPod. The arrival of video-capable iPods sparked video podcasting. Flash video had arrived in force, with the help of some serious web video sites like YouTube. The big three media players changed membership, with Real player becoming a distant fourth. In fact, by 2006, I didn’t even have Real installed on my G5 as nobody was putting out video that QuickTime or WMP wouldn’t handle.
Gore and Mark Bell from Film Threat hosted a couple of panels at the con’s film festival (where my costumed appearance got some nasty looks from the black-clad filmistas—clearly a line is drawn in some people’s minds between the film fest and the convention itself!), and I attended a couple of them.
In one panel, Gore and Bell introduced the two guys behind Ask a Ninja as well as a couple of people from Hope is Emo, two of the most popular podcasts. I was still sans-internet at home, so I wasn’t aware of how big podcasting and web video had become. More people were watching these online videos than hundreds of film festivals put together.
But the indie aspect of these productions—Ninja was shot in the star’s apartment (painted up for green-screen production)—made it clear that you didn’t need a lot of money, just enough technology and, of course, a good idea well executed, to build an audience.
DVD suddenly looked less essential, just like VHS. Apple introduced its TV interface, and with flatscreen TVs and computer monitors becoming essentially the same, the average consumer realized they didn’t need a disk or tape to watch movies, TV shows, and indie video. The messy blue laser fight didn’t help, with the traditional market split into 3 different camps—DVD loyalists, Blu-Ray, and HD-DVD. Even with HD-DVD losing the fight, most people I know aren’t rushing into the blue laser world. After seeing CDs largely replaced by web music, most people are expecting the same of video.
So… in the 9 years I have been dabbling with indie video, I have seen it change completely. A physical product is no longer the primary goal since you can find a larger audience thorugh the magic of internet pixels.
Mullet and I are prepping our old feature, Babysitters, for web in small chapters. Our long-in-development DVD project is now a web video project with a DVD version also available. We’ll follow the footsteps of successful web video people like Rob Schrab or the guys behind Chad Vader and put the videos online and make a full-quality DVD available for sale.
More on web video to come. After all, it’s Tuesday. There’ll probably be some new development on Wednesday….
Tuesday, February 5, 2008
Magic Bullet Looks
I had to learn how to use the screen capture feature in OS X. I’d used it a long time ago in OS 9, and I was cursing tonight as I tried to figure out why I couldn’t paste after pressing Cmd-shift-3. It wasn’t until later that I noticed a bunch of image files on the desktop. Sweet!
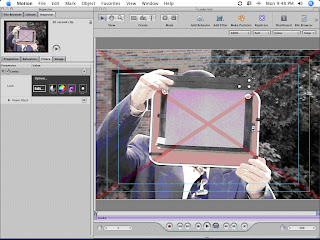
Magic Bullet Looks is pretty easy to use. I downloaded the Motion plug-in version, so I don't know how the Final Cut or other versions work compared to this one. I plopped my test clip into the Motion project, opened the library tab to find the Looks filter (not under 3rd party filters, but under Filters/Magic Bullet). I dragged the filter to the clip and it’s ready to work:
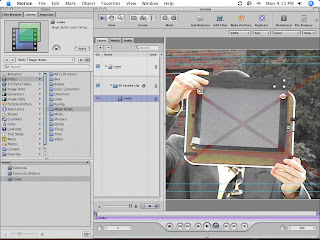
Magic Bullet Looks is pretty easy to use. I downloaded the Motion plug-in version, so I don't know how the Final Cut or other versions work compared to this one. I plopped my test clip into the Motion project, opened the library tab to find the Looks filter (not under 3rd party filters, but under Filters/Magic Bullet). I dragged the filter to the clip and it’s ready to work:
The red X is the demo’s reminder that I haven’t paid for this yet, but you get all features enabled in the demo, which is nice--I've always disliked feature-disabled demos.
I clicked on the Inspector tab and pressed the big edit button to open the interface, which opens a separate app named LooksBuilder. This is a really nice interface, easy on the eyes, and clearly designed by people who do this type of work:
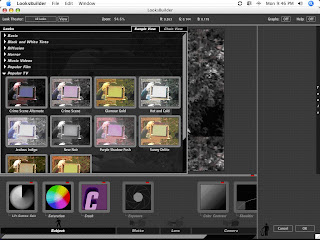
By moving the cursor over the Looks tab on the left side, you get 10 categories of different looks (Basic, Black and White Tints, Diffusion, Horror, Music Videos, Popular Film, Popular TV, Special Effects, Stock Emulation, and Tints). To apply a look, you open the category arrow and click on the specific look. Here I’m picking Crime Scene so that my sunny outdoors clip looks like it’s a crime scene in Vegas.
I clicked on the Inspector tab and pressed the big edit button to open the interface, which opens a separate app named LooksBuilder. This is a really nice interface, easy on the eyes, and clearly designed by people who do this type of work:

By moving the cursor over the Looks tab on the left side, you get 10 categories of different looks (Basic, Black and White Tints, Diffusion, Horror, Music Videos, Popular Film, Popular TV, Special Effects, Stock Emulation, and Tints). To apply a look, you open the category arrow and click on the specific look. Here I’m picking Crime Scene so that my sunny outdoors clip looks like it’s a crime scene in Vegas.
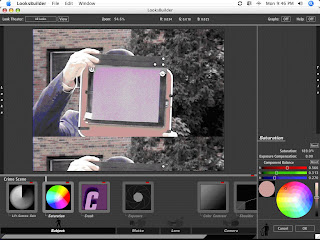
Once applied, you can tweak to your heart’s content, with Lift-Gamma-Gain, Saturation, Crush, Exposure, Color Contrast, and Shoulder being your tools. I’ve picked Saturation here, and a colour wheel and sliders pops up.
But wait—there’s more! By clicking on the tools at the bottom, you can open the tab on the right side of the screen for more tools I’ve ever seen before. Here is the Matte tab, with 22 tools on it alone. This is where the hardcore tweaking takes place. As I’m not a colour-correctoin or video expert, I’m not going to get into the nuts and bolts here as I’d need too many words and time to stumble through their use. Suffice it to say, there’s a lot of things you can do to your video here.
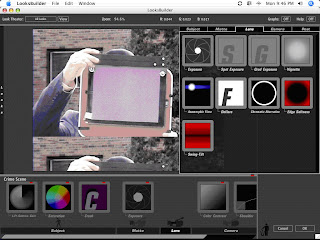
Clicking on OK takes you back to Motion, with all the tweaks you’ve made added to your clip as an easily reversible or deleteable sub-layer.
I spent the longest time trying out the different looks and a little bit of time playing with the tools, but I’m way over my head with this stuff. I’ve got a book on colour correction that I’ll blog about later on, once I get my feet wet with this type of pixel-pushing.
Overall, I’m really impressed with Magic Bullet Looks. It’s easy to use yet provides you with a lot of tools to do some hardcore work. For a no-budget filmmaker like me who is more interested in the writing and acting end of things, this plug-in is certainly an easy way to look good on video.
At some point, after I’ve looked at the other software in my 2008 Roundup, I’ll post some video created with each program as these stills aren’t offering a lot of detail on how the video looks when it’s actually playing….

But wait—there’s more! By clicking on the tools at the bottom, you can open the tab on the right side of the screen for more tools I’ve ever seen before. Here is the Matte tab, with 22 tools on it alone. This is where the hardcore tweaking takes place. As I’m not a colour-correctoin or video expert, I’m not going to get into the nuts and bolts here as I’d need too many words and time to stumble through their use. Suffice it to say, there’s a lot of things you can do to your video here.

Clicking on OK takes you back to Motion, with all the tweaks you’ve made added to your clip as an easily reversible or deleteable sub-layer.

I spent the longest time trying out the different looks and a little bit of time playing with the tools, but I’m way over my head with this stuff. I’ve got a book on colour correction that I’ll blog about later on, once I get my feet wet with this type of pixel-pushing.
Overall, I’m really impressed with Magic Bullet Looks. It’s easy to use yet provides you with a lot of tools to do some hardcore work. For a no-budget filmmaker like me who is more interested in the writing and acting end of things, this plug-in is certainly an easy way to look good on video.
At some point, after I’ve looked at the other software in my 2008 Roundup, I’ll post some video created with each program as these stills aren’t offering a lot of detail on how the video looks when it’s actually playing….
Wednesday, January 16, 2008
It's a RAID
I’m still playing with the software tests, so here’s an exciting article on hard drives and hard drive maintenance. I spend a few hours each month taking care of the drives, and I believe it’s helped me avoid problems ranging from dropped frames to corrupted files.
Last week, my G5 was equipped with 575 gigabytes of hard drive turf. For an average computer owner, this is a lot of space, but video editing really eats up the bytes. I needed to add more hard drives, so I opted to buy a RAID, which adds an additional 1000 GB (or 1 TB, but I wanted to spell out the 3 zeroes—cheap geek thrills!) of capacity to my Mac.
I have a 1.6 MHz G5, which came with an 80 GB boot drive. Back in 2003, that was a pretty generous boot drive. I took the two 120-GB ATA drives that had been mounted internally in my G4 and put them into Firewire enclosures for 320 GB in total. OS X is not a space hog like that Windoze crap, so less than 4 GB of real estate is occupied by the operating system, leaving well over 300 GB in free space for apps, docs, and media files.
I used my G5 for everything: preproduction, post-production, grocery lists, money management stuff, and games. I kept the media files (clips, audio, graphics, rendering files, etc.) on the external drives, and I put everything else on the boot drive.
But my iTunes library kept growing as I ripped more of my CDs, so I added a 250 GB SATA drive in the empty bay and moved all the docs off the boot drive. I partitioned the SATA drive into an 80-GB partition (for backing up the boot drive) and the rest for docs.
I added Final Cut Studio 1 to the mix, plus a bunch of other apps, and I also added Internet access. The available space on all the drives began to shrink.
I added a couple of apps to help keep things clean by removing temp files, etc., which can clog up space. The first was a freeware program called MacJanitor which runs built-in Unix maintenance programs that normally run overnight, but with people like me who don’t keep computers on constantly, this program helps. I eventually replaced MacJanitor with a bigger app, Onyx, which does everything MacJanitor does plus a whole pile of things, especially cleaning up temp files. For safety, I bought Micromat’s excellent TechTool Pro, which has a suite of tests, diagnostics, and optimization tools.
I used a shareware program, Carbon Copy Cloner, to back up the boot drive about once a month. Since I set up a subscription with Mac.com, I use the Backup app included with the deal, I haven’t used the Cloner, but it’s a great tool.
The DV Shop recommended against defragmenting media drives—they recommended reformatting once the project is done. But with our projects still ongoing, I’ve had some of the clips on the external drives for a few years, so I periodically use Techtool to defrag the hard drives.
Every time I ran software updates, I’d lose more space. Eventually, I had just 9 GB free on the boot drive, which means I was using 89% of the drive. I’ve read in a few places that you shouldn’t exceed 80%, so it was time to change the boot drive. I hadn’t experienced any slowdowns with the nearly full drive, but I didn’t want to have anything go wrong during post-production on the DVD.
So… my first thought was to swap the 2 internal drives, using the larger partition (170 GB) on the 250 GB drive as the new boot drive and the original boot drive for media.
My external drives were filling up, too, with the DVD projects taking up space as we shot them, and I was keeping the olde stuff on there in case we needed it for the DVD as well. Out of the 250 GB or so of media drive real estate, I had about 60 GB left open. This is probably enough space to get through the DVD production next summer.
Then I saw an ad for Carbon Computing, who carries Elephant Storage disk drives and— boom!—another option appeared. With Serial ATA drives coming down in price, the Elephant 1 terabyte RAID (two 500 GB SATA drives in a case) was just $400 CAD. I couldn’t find 1 TB RAIDS as cheap anywhere else.
Weighing the two options, I decided to put the money down and expand the media drives and take care of my current and future hard drive problems with one device. I bought the RAID.
The RAID is not large at all—it’s not much bigger than the 2 cases the ATA drives are mounted in. It has a Firewire 800, a Firewire 400, and a USB 2, and it comes pre-formatted for OS X. The default configuration is as a striped RAID, the drives alternating, but can be reformatted to mirrored status. I opted to keep the striped RAID going—this was going to be my new media capture drive.
There is no instruction manual in the box, or on the drive itself, but there is a downloadable PDF at the Elephant website. The Elephant website is somewhat vague about the company’s particulars, so given that Carbon is the only retailer listed I think it’s probably part of the Carbon Computing company. I have no complaints about the product so far—everything’s assembled, you get USB, Firewire400 and Firewire800 cables, and the powerpack. The case is similar to the Mac tower’s metal case, and the front grill glows blue when it’s on.
Setup was painless. I plugged in the power supply, connected it to my Firewire800 port, and fired up the RAID. It appeared on the desktop without any problem. I turned on the other 2 external drives (one in a Firewire 400 case and the other connected via Firewire 800) and copied both to the RAID as the first test. I didn’t time them, but the Firewire 800 drive transferred files faster than the Firewire 400 did.
Next, I copied the contents of the two internal SATA drives to the RAID. I used Carbon Cloner to copy the boot drive, but I just dragged the other drive to the RAID and it copied. Overall, the internal drives copied much faster than I expected, but as expected the boot drive cloning was the slowest part of the process.
After I’d copied all the drives, I tested random files on the RAID to make sure everything opened and worked normally. I also ran Tech Tool to make sure the RAID was okay, and all the tests came back good.
One quirk, probably a bug from the depths of Firewire 800, is that I can only disconnect the drive to shut it down if the other Firewire 800 drive is also on and connected. Not a major problem, but I have to wait until the G5 shuts down before I can power off the RAID.
Next came the scary part. I deleted the contents of the partitioned drive and reformatted it as a single 250 GB drive. I considered using the install DVDs to create the new OS, but I opted to use Carbon Copy to duplicate the boot drive to preserve my settings. The boot disk now fills 71 gigabytes, so there’s plenty of space for more stuff!
I then went into the OS X Control Panel and picked the 250 GB drive as the startup disk. Then I rebooted while holding my breath, and when it restarted, everything worked fine. I spent quite a while making sure that all the apps worked, the external drives connected properly, and that all the docs opened properly. I ran Tech Tool’s tests a few times to make sure all the drives were working.
Once satisfied, I reformatted the 80 GB boot drive and copied the documents from the RAID over to it.
Next, I reformatted the two external drives to free them up. This wasn’t as stressful as all the contents worked fine on the RAID. I then set up Backup to backup the boot drive to the Firewire 400 drive.
The Firewire 800 drive is now my floater—extra space for post-production on my G5 and to move big files between my G5 and my iBook. I’ll probably backup the iPhoto and iTunes libraries as well.
The speed of the RAID is noticeable. I don’t have the software to time things out (nor do I really care to do so), but Norton whipped through an antivirus scan that would have taken hours, not minutes, on the external drives. And file transfers are faster. Clearly, the SATA interface and the striped drives are much quicker than a single ATA drive with an Oxford 911 enclosure.
Well, that’s all the excitement for this week. I hope to get one of my evaluations posted next week—honest!
Last week, my G5 was equipped with 575 gigabytes of hard drive turf. For an average computer owner, this is a lot of space, but video editing really eats up the bytes. I needed to add more hard drives, so I opted to buy a RAID, which adds an additional 1000 GB (or 1 TB, but I wanted to spell out the 3 zeroes—cheap geek thrills!) of capacity to my Mac.
I have a 1.6 MHz G5, which came with an 80 GB boot drive. Back in 2003, that was a pretty generous boot drive. I took the two 120-GB ATA drives that had been mounted internally in my G4 and put them into Firewire enclosures for 320 GB in total. OS X is not a space hog like that Windoze crap, so less than 4 GB of real estate is occupied by the operating system, leaving well over 300 GB in free space for apps, docs, and media files.
I used my G5 for everything: preproduction, post-production, grocery lists, money management stuff, and games. I kept the media files (clips, audio, graphics, rendering files, etc.) on the external drives, and I put everything else on the boot drive.
But my iTunes library kept growing as I ripped more of my CDs, so I added a 250 GB SATA drive in the empty bay and moved all the docs off the boot drive. I partitioned the SATA drive into an 80-GB partition (for backing up the boot drive) and the rest for docs.
I added Final Cut Studio 1 to the mix, plus a bunch of other apps, and I also added Internet access. The available space on all the drives began to shrink.
I added a couple of apps to help keep things clean by removing temp files, etc., which can clog up space. The first was a freeware program called MacJanitor which runs built-in Unix maintenance programs that normally run overnight, but with people like me who don’t keep computers on constantly, this program helps. I eventually replaced MacJanitor with a bigger app, Onyx, which does everything MacJanitor does plus a whole pile of things, especially cleaning up temp files. For safety, I bought Micromat’s excellent TechTool Pro, which has a suite of tests, diagnostics, and optimization tools.
I used a shareware program, Carbon Copy Cloner, to back up the boot drive about once a month. Since I set up a subscription with Mac.com, I use the Backup app included with the deal, I haven’t used the Cloner, but it’s a great tool.
The DV Shop recommended against defragmenting media drives—they recommended reformatting once the project is done. But with our projects still ongoing, I’ve had some of the clips on the external drives for a few years, so I periodically use Techtool to defrag the hard drives.
Every time I ran software updates, I’d lose more space. Eventually, I had just 9 GB free on the boot drive, which means I was using 89% of the drive. I’ve read in a few places that you shouldn’t exceed 80%, so it was time to change the boot drive. I hadn’t experienced any slowdowns with the nearly full drive, but I didn’t want to have anything go wrong during post-production on the DVD.
So… my first thought was to swap the 2 internal drives, using the larger partition (170 GB) on the 250 GB drive as the new boot drive and the original boot drive for media.
My external drives were filling up, too, with the DVD projects taking up space as we shot them, and I was keeping the olde stuff on there in case we needed it for the DVD as well. Out of the 250 GB or so of media drive real estate, I had about 60 GB left open. This is probably enough space to get through the DVD production next summer.
Then I saw an ad for Carbon Computing, who carries Elephant Storage disk drives and— boom!—another option appeared. With Serial ATA drives coming down in price, the Elephant 1 terabyte RAID (two 500 GB SATA drives in a case) was just $400 CAD. I couldn’t find 1 TB RAIDS as cheap anywhere else.
Weighing the two options, I decided to put the money down and expand the media drives and take care of my current and future hard drive problems with one device. I bought the RAID.
The RAID is not large at all—it’s not much bigger than the 2 cases the ATA drives are mounted in. It has a Firewire 800, a Firewire 400, and a USB 2, and it comes pre-formatted for OS X. The default configuration is as a striped RAID, the drives alternating, but can be reformatted to mirrored status. I opted to keep the striped RAID going—this was going to be my new media capture drive.
There is no instruction manual in the box, or on the drive itself, but there is a downloadable PDF at the Elephant website. The Elephant website is somewhat vague about the company’s particulars, so given that Carbon is the only retailer listed I think it’s probably part of the Carbon Computing company. I have no complaints about the product so far—everything’s assembled, you get USB, Firewire400 and Firewire800 cables, and the powerpack. The case is similar to the Mac tower’s metal case, and the front grill glows blue when it’s on.
Setup was painless. I plugged in the power supply, connected it to my Firewire800 port, and fired up the RAID. It appeared on the desktop without any problem. I turned on the other 2 external drives (one in a Firewire 400 case and the other connected via Firewire 800) and copied both to the RAID as the first test. I didn’t time them, but the Firewire 800 drive transferred files faster than the Firewire 400 did.
Next, I copied the contents of the two internal SATA drives to the RAID. I used Carbon Cloner to copy the boot drive, but I just dragged the other drive to the RAID and it copied. Overall, the internal drives copied much faster than I expected, but as expected the boot drive cloning was the slowest part of the process.
After I’d copied all the drives, I tested random files on the RAID to make sure everything opened and worked normally. I also ran Tech Tool to make sure the RAID was okay, and all the tests came back good.
One quirk, probably a bug from the depths of Firewire 800, is that I can only disconnect the drive to shut it down if the other Firewire 800 drive is also on and connected. Not a major problem, but I have to wait until the G5 shuts down before I can power off the RAID.
Next came the scary part. I deleted the contents of the partitioned drive and reformatted it as a single 250 GB drive. I considered using the install DVDs to create the new OS, but I opted to use Carbon Copy to duplicate the boot drive to preserve my settings. The boot disk now fills 71 gigabytes, so there’s plenty of space for more stuff!
I then went into the OS X Control Panel and picked the 250 GB drive as the startup disk. Then I rebooted while holding my breath, and when it restarted, everything worked fine. I spent quite a while making sure that all the apps worked, the external drives connected properly, and that all the docs opened properly. I ran Tech Tool’s tests a few times to make sure all the drives were working.
Once satisfied, I reformatted the 80 GB boot drive and copied the documents from the RAID over to it.
Next, I reformatted the two external drives to free them up. This wasn’t as stressful as all the contents worked fine on the RAID. I then set up Backup to backup the boot drive to the Firewire 400 drive.
The Firewire 800 drive is now my floater—extra space for post-production on my G5 and to move big files between my G5 and my iBook. I’ll probably backup the iPhoto and iTunes libraries as well.
The speed of the RAID is noticeable. I don’t have the software to time things out (nor do I really care to do so), but Norton whipped through an antivirus scan that would have taken hours, not minutes, on the external drives. And file transfers are faster. Clearly, the SATA interface and the striped drives are much quicker than a single ATA drive with an Oxford 911 enclosure.
Well, that’s all the excitement for this week. I hope to get one of my evaluations posted next week—honest!
Tuesday, December 11, 2007
To Upgrade or Not to Upgrade—that is the question.
…Whether 'tis nobler to stand pat with what I’ve got….
As next spring’s post on our DVD draws nearer, I’ve been contemplating the post-production aspect of it: do I have the tools to do a really good job by current standards?
I could produce a functioning DVD with basic tools, even freeware apps, but the goal with this project is to produce a demo reel to put into the hands of the mighty. If we sell a few of them, all the better, but I wouldn’t want to sell anyone something that wasn’t the result of Mullet and I playing at the top of our game. Mullet takes the same approach with the comic, as does our artist, Kameron Gates.
At the moment, I have a G5 (single 1.6 GHz processor, the original low-end G5 model) and Final Cut Studio 1 as my software. I have a pair of 250 GB external hard drives for video capture, and I listen to the whole thing via a 10-watt Radio Shack amp and $30 Radio Shack speakers. This is probably as no-budget as you can get! I won’t be replacing the G5, so my focus will be on the software.
I’m running OS X Tiger, and I haven’t decided whether I’ll upgrade to the new Mac OS, Leopard, yet. I usually wait some time before upgrading, but I’m happy with how fast and stable Tiger is—Leopard’s new features haven’t prompted me to run down to Riverdale Mac just yet. I’ll revisit the OS after the DVD’s done, but I don’t anticipate, at this point, upgrading based on some of the negative experiences people have had. If the consensus on the various forums that focus on all things Final Cut and Mac come back with reports of speed increases or can’t-work-without features, I might take the plunge.
I am, however, evaluating 4 options for upgrading my current apps:
- Stand pat with what I’ve got ($0)
- Upgrade to Final Cut Studio 2 ($545 CAD),
- Buy Magic Bullet Suite ($799 USD) or just one of the Magic Bullet apps
- Buy Adobe AfterEffects ($1149 CAD for CS3, $1969 CAD for the Production Premium version, which adds PhotoShop, Illustrator, etc.).
Taking Magic Bullet for a ride is step one in my evaluation. Magic Bullet was created by Stu Maschwitz of The Orphanage, and it’s been a well-known plug-in and stand-alone app for years. Last spring, I bought Stu’s book, The DV Rebel's Guide: An All-Digital Approach to Making Killer Action Movies on the Cheap, which I’d recommend to anyone making no-budget movies (even if you’re not shooting action flicks, there’s plenty of good information there), and found his blog and forum there quite interesting.
Magic Bullet Suite is priced at $799 USD, and you get Magic Bullet Looks (applies preset or user-created “looks” to video), Magic Bullet Frames (converts 60i to 24p, also deinterlaces video), Magic Bullet Colorista (3-way colour correction), and Instant HD (converts SD video to HD video). These programs are either stand-alone or plug-ins for FCP and Motion, but the demos seem to be plug-ins only. I’ve read a few reviews for Colorista, plus various forum comments, and all have been positive. I can’t recall any negative comments, actually. I downloaded the demos for Magic Bullet Looks and Colorista, and in a future post I’ll let you know how they’ve worked out.
Upgrading to Final Cut Studio 2 would give me the latest versions of that bundle: Final Cut Pro 6, DVD Studio Pro 4, Motion 3, Compressor 3, and Soundtrack Pro 2, plus the new app, Color. At the moment, this would be a $545 CAD investment. The learning curve is the lowest here given that I’m familiar with the previous versions of all these apps, with the exception of Color. There are no demos available for FCS 2, so I’ll have to rely upon reviews and the Apple website for evaluation. The reviews of FCS 2 have been positive overall, although some people don’t like Color.
Whether I upgrade or not, I’ll be using FCP, Soundtrack Pro, Compressor, and DVD SP for the DVD. These are good, stable programs that meet most of my needs for no-budget post-production. The only needs I find wanting are in the areas of mastering and onlining.
Stu’s book goes into onlining quite a bit—getting the video from your non-linear editing program to the final version enjoyed by millions. Colour correction and mastering are the two main areas. In the book, Stu has reservations about using FCP for onlining and recommends using AfterEffects since FCP renders at 8-bits and AE can render 8-, 16-, or 24-bits. The higher the bit rate, the better the filters and transitions look. With Stu’s workflow, you don’t do any rendering at all in FCP—you export everything sans transitions and filters, and apply them inside AfterEffects instead.
In FCP 5, you’re limited to 8-bit rendering, but Apple promises that FCP 6 does 16- and 24-bit rendering, as does Color, but I haven’t seen anyone come out with a clear statement on whether it works as well as AE does, even on Stu’s blog and forum.
I’ll download the AfterEffects CS3 demo and try it out once I’ve played with Magic Bullet. I had AfterEffects 3 way back when OS9 ruled the Mac world, so I’m somewhat familiar with the program, but I suspect that CS3 is probably a lot more sophisticated than 3 is!
To evaluate the 2 demos, I’ll take the same sequence from a Final Cut project, export it as a DV QuickTime file, and import it into each program (bearing in mind that the Magic Bullet demo is plug-in only, I’ll presumably be using FCP’s rendering engine when I test Magic Bullet, so I’m testing the interface more than I am the output).
I’ll come up with 3 or 4 different things I want to test, and use Magic Bullet, AfterEffects, and Final Cut Studio 1 to independently come up with 3 different versions. Once I’ve done all 9 or 12 tests, I’ll export them as QuickTime files and bring them into Compressor to convert into H.264 and DVD files. I’ll run the DVD files through DVD Studio Pro to create DVDs to look at on various TVs, and I’ll test the H.264 files on a mix of computers, mostly Windows.
I’ll post results for these evaluations in the coming weeks.
Tuesday, November 27, 2007
What’s Going on Today (or, Meanwhile back in 2007)
Now that I’ve updated what went on in 2001-2002, here’s an update on what we’re doing right now in 2007.
Mullet is slaving away on the issue 2 script. This is taking a lot of his free time, naturally. But he’s way ahead of where we were for issue 1 so there’ll be more time for story editing and polishing. I’ll see the script eventually and give him some feedback as his story editor.
Writing a comic book is a unique craft compared to screenwriting or prose—you have to come up with the usual story elements (plot, character, dialogue, action), but you also work on the layout of panels and pages. Until Mullet started writing our comic book, I had no idea what the roles of the writer, artist, etc were in that format. Like with movies and TV, well-written and well-designed comics make the writing transparent, so I never really thought about it before. I have more respect for the writers now, to be sure.
Meanwhile, back at the video ranch, I’m chasing a bunch of loose ends. This blog takes some of my time, and I’ve used it to find the discipline necessary to get back to writing almost every day (with the goal for every day). I am working on several script ideas, which I hope to have ready for Mullet by December. I have 4 shorts on the go as rough drafts, plus about a dozen interstitial/blackout type ideas that I think we’ll either use on the DVD as transitions and/or as a collection of short bits that we’ll post online.
When I get tired of writing, I’ve been playing around with the Babysitters final cut, and I finally got back to working on the edit of Can that Andrew Currie did for us. I still have to put Stalled together, and I’m working on an idea for opening credits (for the shorts) that will tie into the comic a bit (I sketched out some quick storyboards and then started some tests in Motion to see how I could accomplish what I’d drawn).
I’ve also downloaded the demo for 2 elements of Red Giant Software’s Magic Bullet Suite. More about that next time, once I’ve had the chance to play with it.
So that’s where we’re at, for the moment.
Mullet is slaving away on the issue 2 script. This is taking a lot of his free time, naturally. But he’s way ahead of where we were for issue 1 so there’ll be more time for story editing and polishing. I’ll see the script eventually and give him some feedback as his story editor.
Writing a comic book is a unique craft compared to screenwriting or prose—you have to come up with the usual story elements (plot, character, dialogue, action), but you also work on the layout of panels and pages. Until Mullet started writing our comic book, I had no idea what the roles of the writer, artist, etc were in that format. Like with movies and TV, well-written and well-designed comics make the writing transparent, so I never really thought about it before. I have more respect for the writers now, to be sure.
Meanwhile, back at the video ranch, I’m chasing a bunch of loose ends. This blog takes some of my time, and I’ve used it to find the discipline necessary to get back to writing almost every day (with the goal for every day). I am working on several script ideas, which I hope to have ready for Mullet by December. I have 4 shorts on the go as rough drafts, plus about a dozen interstitial/blackout type ideas that I think we’ll either use on the DVD as transitions and/or as a collection of short bits that we’ll post online.
When I get tired of writing, I’ve been playing around with the Babysitters final cut, and I finally got back to working on the edit of Can that Andrew Currie did for us. I still have to put Stalled together, and I’m working on an idea for opening credits (for the shorts) that will tie into the comic a bit (I sketched out some quick storyboards and then started some tests in Motion to see how I could accomplish what I’d drawn).
I’ve also downloaded the demo for 2 elements of Red Giant Software’s Magic Bullet Suite. More about that next time, once I’ve had the chance to play with it.
So that’s where we’re at, for the moment.
Wednesday, November 14, 2007
The 74-Minute Skeleton in Our Closet, 6: Revisiting the Past
We sat down and watched Babysitters recently. I hadn’t watched it since some time in 2003 or 2004, so I’d forgotten a lot of things about it. Come to think of it, I’d forgotten about most of it.
I have to admit I didn’t look forward to seeing it again. I’d been grateful that we’d left it alone for so long. When you’ve advanced ahead in terms of experience and knowledge, it’s not easy to go back and see earlier efforts and not cringe at the mistakes.
So, as we started the movie, I waited for the cringing to begin.
The first part of the movie ran surprisingly well. From the beginning to the opening credits, the pacing helps to hide the flaws. So far, so good….
The first scene after the credits, featuring a well-known ACTRA and SAG performer who donated his time, is quite slow, but after the buildup to the credits, it felt right to slow down before starting to build up again.
The middle of the movie had a sequence that no longer made sense to be in the movie (Mullet had to remind me why it was there, actually: to fit one of the plot points in Gulliver’s Travels), so we decided to cut it out. The rest of the movie builds up a bit and comes to an abrupt end.
So, we’ll be recutting it again, from 74 minutes to something much shorter, likely still over the Academy’s 40-minute limit to qualify as a feature, but under an hour and with most of the leaden pacing removed. There are some things we won’t be able to take out or speed up, so there will still be some loooooong moments in there.
The audio is out of sync in a few places, so I’ll have to spend some time playing with that to fix it. Fortunately, with Final Cut Studio, you get a marvelous audio workstation program, Soundtrack Pro, which allows this type of finessing.
Overall, I was pleasantly surprised to not hate it as much as I had feared before the screening. For a first project for a couple of guys who hadn’t been near film classes before, it’s not that bad. So, for once, I realized that the effort we had put into it, all the work our cast and crew had put into it, was worth it.
I think we should be able to put the opening sequence on the DVD, just to show the world what you can do with two clown, a baby, and a camcorder.
I have to admit I didn’t look forward to seeing it again. I’d been grateful that we’d left it alone for so long. When you’ve advanced ahead in terms of experience and knowledge, it’s not easy to go back and see earlier efforts and not cringe at the mistakes.
So, as we started the movie, I waited for the cringing to begin.
The first part of the movie ran surprisingly well. From the beginning to the opening credits, the pacing helps to hide the flaws. So far, so good….
The first scene after the credits, featuring a well-known ACTRA and SAG performer who donated his time, is quite slow, but after the buildup to the credits, it felt right to slow down before starting to build up again.
The middle of the movie had a sequence that no longer made sense to be in the movie (Mullet had to remind me why it was there, actually: to fit one of the plot points in Gulliver’s Travels), so we decided to cut it out. The rest of the movie builds up a bit and comes to an abrupt end.
So, we’ll be recutting it again, from 74 minutes to something much shorter, likely still over the Academy’s 40-minute limit to qualify as a feature, but under an hour and with most of the leaden pacing removed. There are some things we won’t be able to take out or speed up, so there will still be some loooooong moments in there.
The audio is out of sync in a few places, so I’ll have to spend some time playing with that to fix it. Fortunately, with Final Cut Studio, you get a marvelous audio workstation program, Soundtrack Pro, which allows this type of finessing.
Overall, I was pleasantly surprised to not hate it as much as I had feared before the screening. For a first project for a couple of guys who hadn’t been near film classes before, it’s not that bad. So, for once, I realized that the effort we had put into it, all the work our cast and crew had put into it, was worth it.
I think we should be able to put the opening sequence on the DVD, just to show the world what you can do with two clown, a baby, and a camcorder.
Tuesday, November 6, 2007
The 74-Minute Skeleton in Our Closet, 5: No-Budget Finances
Compared to most student features, Babysitters was an inexpensive project, but for two people putting up all the money themselves, it wasn’t cheap!
With the purchase of computer software and hardware, video equipment, supplies, props, and the mandatory on-set food and drink, I put around $5500 CAD into it (equivalent of about $3600 US in 2002). Mullet put in $2000 CAD, so our budget for Babysitters for 2001-2002 was $7500 CAD, or about $4900 USD in 2002 dollars (all dollar numbers below are in Canadian funds).
So… what did $7500 buy us besides 74-minutes of hilarity?
Most of that money went into fixed assets like computers, software, extra hard drives, a tripod, shotgun microphone, etc., so the money we spent on Babysitters has saved considerable money on subsequent projects. We can now make a short for the costs of blank tapes, food, beverages, gas, parking, office supplies, and the occasional new prop.
For Babysitters, as a general strategy, we decided to buy inexpensive gear rather than rent better stuff since we had a lot of single shooting days spread out over 9 months. If we’d scheduled the shoot to take place within a single block of time or two, the rental option would have made more sense, so your schedule will dictate your finances a great deal.
We never prepared a budget beforehand, which is something we should have done, in hindsight. If we had done a budget, though, we would have revised it constantly as we came across new expenses that we hadn’t anticipated—every rookie mistake will cost you money.
We averaged about $100 each day for food, beverages, props, gas, parking, and supplies like mini-DV tapes, and that has been our typical budget ever since. We’ve always been able to borrow cameras, so we’ve never had to rent one (about $200/day for a DVX100 or similar camera in Toronto these days).
We also don’t pay our actors or crew anything. This means we don’t use people who belong to the acting guild in Canada, ACTRA, as we can’t afford the minimums that the guild has in place for its members. If we did use guild people without following procedure, we would never be able to sell the project to anyone, so it’s not worth it. ACTRA does have a low-budget program, but they’re still pretty big bucks for anyone at the no-budget level. The guilds in your area will have similar rules and policies that you should know before starting a project.
Any decent film school has an introductory producing class, so I’d recommend taking one before plunging into shooting. If I didn’t live near a dozen film schools like there are in Toronto, the internet has leveled the playing field—you can get just about any book on film and video producing, and there are a lot of good websites, lists, and blogs on the topic as well. I’ll post an entry with some links at some point.
You also want to budget your time. For longer projects, you should anticipate the demands on your time during all phases of production. A good production management book or course can give you an idea of how much time you’ll need to do things (and it will always take longer to do something than you’d think it would…).
We saved money where we could with gear. Instead of buying a microphone boom pole, I modified a $15 window-washing extension arm with a PVC collar and mini-bungee cords to create a shock mount (this guy had a similar idea). We used a $5 desktop mike stand for most of the shoots—putting the mike at the feet of our performers just out of frame with the mike aimed up. I bought 3 sets of halogen work lights for our interiors, using gels to convert them whenever needed to sunlight-balanced light. I built camera stabilizers (to make handheld shots easier) with raw materials from Canadian Tire (after seeing how much a pro stabilizer cost). All of this stuff may look cheap and crappy, but with a little work, it does the same job as the pro gear at a fraction of the cost.
We only had to pay for locations three times, when we shot scenes in rehearsal spaces. We used both our apartments, interior and exterior, for as many distinct locations as we could squeeze out of them, and we used someone’s apartment for another location. We found and used a deserted lot downtown, and we used public property elsewhere. We didn’t build sets, which is another big expense even for something small.
We were fortunate in that we avoided the debt like a lot of filmmakers get into with features, so I don’t have any advice to others on how to manage it. Just avoid it if you can. After all, no-budget means no-money….
With the purchase of computer software and hardware, video equipment, supplies, props, and the mandatory on-set food and drink, I put around $5500 CAD into it (equivalent of about $3600 US in 2002). Mullet put in $2000 CAD, so our budget for Babysitters for 2001-2002 was $7500 CAD, or about $4900 USD in 2002 dollars (all dollar numbers below are in Canadian funds).
So… what did $7500 buy us besides 74-minutes of hilarity?
Most of that money went into fixed assets like computers, software, extra hard drives, a tripod, shotgun microphone, etc., so the money we spent on Babysitters has saved considerable money on subsequent projects. We can now make a short for the costs of blank tapes, food, beverages, gas, parking, office supplies, and the occasional new prop.
For Babysitters, as a general strategy, we decided to buy inexpensive gear rather than rent better stuff since we had a lot of single shooting days spread out over 9 months. If we’d scheduled the shoot to take place within a single block of time or two, the rental option would have made more sense, so your schedule will dictate your finances a great deal.
We never prepared a budget beforehand, which is something we should have done, in hindsight. If we had done a budget, though, we would have revised it constantly as we came across new expenses that we hadn’t anticipated—every rookie mistake will cost you money.
We averaged about $100 each day for food, beverages, props, gas, parking, and supplies like mini-DV tapes, and that has been our typical budget ever since. We’ve always been able to borrow cameras, so we’ve never had to rent one (about $200/day for a DVX100 or similar camera in Toronto these days).
We also don’t pay our actors or crew anything. This means we don’t use people who belong to the acting guild in Canada, ACTRA, as we can’t afford the minimums that the guild has in place for its members. If we did use guild people without following procedure, we would never be able to sell the project to anyone, so it’s not worth it. ACTRA does have a low-budget program, but they’re still pretty big bucks for anyone at the no-budget level. The guilds in your area will have similar rules and policies that you should know before starting a project.
Any decent film school has an introductory producing class, so I’d recommend taking one before plunging into shooting. If I didn’t live near a dozen film schools like there are in Toronto, the internet has leveled the playing field—you can get just about any book on film and video producing, and there are a lot of good websites, lists, and blogs on the topic as well. I’ll post an entry with some links at some point.
You also want to budget your time. For longer projects, you should anticipate the demands on your time during all phases of production. A good production management book or course can give you an idea of how much time you’ll need to do things (and it will always take longer to do something than you’d think it would…).
We saved money where we could with gear. Instead of buying a microphone boom pole, I modified a $15 window-washing extension arm with a PVC collar and mini-bungee cords to create a shock mount (this guy had a similar idea). We used a $5 desktop mike stand for most of the shoots—putting the mike at the feet of our performers just out of frame with the mike aimed up. I bought 3 sets of halogen work lights for our interiors, using gels to convert them whenever needed to sunlight-balanced light. I built camera stabilizers (to make handheld shots easier) with raw materials from Canadian Tire (after seeing how much a pro stabilizer cost). All of this stuff may look cheap and crappy, but with a little work, it does the same job as the pro gear at a fraction of the cost.
We only had to pay for locations three times, when we shot scenes in rehearsal spaces. We used both our apartments, interior and exterior, for as many distinct locations as we could squeeze out of them, and we used someone’s apartment for another location. We found and used a deserted lot downtown, and we used public property elsewhere. We didn’t build sets, which is another big expense even for something small.
We were fortunate in that we avoided the debt like a lot of filmmakers get into with features, so I don’t have any advice to others on how to manage it. Just avoid it if you can. After all, no-budget means no-money….
Tuesday, October 30, 2007
The 74-Minute Skeleton in Our Closet, 4: Post-Production
When we wrapped, of course, we had an enormous job in post-production ahead of us. We had over 30 hours of footage to on a large collection of mini-DV tapes. By then, I’d traded in the Powermac 8600 for a brand-new G4. I captured footage each week, once we’d watched our “rushes,” and I’d logged all the takes, but I did nothing more at that point until we were wrapped.
Mullet and I spent one memorable week sitting in front of that G4 trying to put together our first cut. It was sheer hell, so in a blaze of inspiration, we called it Hell Week.
Our self-taught shooting style came home to roost that week.
Our coverage was thin, so we didn’t have a lot of alternatives or any way of speeding scenes up—there was nothing to cut to. So… things had to stay as they were, usually as master shots. To match shots, we had to let things go on too long, and, to further complicate matters, very few shots matched perfectly (no continuity person to notice these things). We ended up using takes because they matched rather than using the best takes. That was the hell part of Hell Week.
There are a lot of first-time filmmakers who have made and who will make the same mistakes, but the silver lining is that we all learn more about putting moving images together when trying to solve problems than when something together easily (an equally important lesson is, of course, to learn from the mistakes and not repeat them the next time).
Today, we edit as we go, so as soon as we’ve shot something I start to put it together to see what we have. Otherwise, you’re blind to what you’ve missed, and your mistakes will likely not be fixable, unless your cast and locations are still available.
Another frustration appeared during Hell Week, something we couldn’t avoid that late in the project.
We’d started working on the project on with Adobe Premiere 6, which proved to be crash-prone and completely unreliable for anything other than crashing the computer at random moments. We had each scene in a separate project file to keep things manageable, but it didn’t matter how long or short the scene was—the software would crash regularly, and whatever work we’d done since the previous save was gone.
To be fair, we were probably demanding too much of Premiere. If we’d been working on a short, it probably would have worked just fine, but even keeping scenes in their own project files was probably too much at times.
Nonetheless, after the rough cut was done, I switched over to the first version of Final Cut Pro, which proved to be much more stable. I ended up using FCP to recreate the editing of a few scenes, and the rest I exported from Premiere as QuickTime movies. I stuck to the separate project files for each scene, but the crashing stopped and we were able to get through the rest of the process much easier.
Despite the obstacles, we had a 124-minute rough cut assembled by December, 2002. Technical errors, the lack of coverage, and the convoluted plot—for a first, student effort, I don’t think we did that badly. If you were to set a classroom full of first-year film students off and running for 8 months of Saturday shoots and the same budget, I think we would have held our own.
Some of the jokes were really good—a DVD gag played really well in particular, and we were complimented by a few people about specific gags that worked well. Some of it doesn’t work, and the story isn’t clear enough at times to make sense—we more or less walked away from the plot during Act 2.
The ending didn’t work very well, but it was because we made a classic rookie mistake when we reshoot parts of it to try to make it work. We didn’t reshoot the entire scene—just the specific shot needed. The retakes, naturally, didn’t match the original shots.
Lesson learned: any time you have to reshoot something, always look at the footage for the entire scene or sequence, print screen caps, and take them with you to the location. Or you can save yourself headaches by getting yourself a really good continuity person!
The project taught us things that we wouldn’t have learned otherwise.
The team itself was well-balanced. Mullet has a lot more performing experience than I do, so in our live performances he did better than I did because I wasn’t as experienced in improv—and we improvised almost everything on stage. With a script, I could hold up my end of the stick better, and the team was much more balanced, something that has carried on in our following projects and live performances.
We both learned a lot about storytelling with video, and the old saying about telling a story three times (on the page, in the camera, in the editing) is very true.
It was time to show our project to an audience to start working on pacing and structure. We had a Christmas Party at the now-defunct Tim Sims Playhouse for the cast, crew, and some invited guests, and we showed them the 124-minute version with temp audio tracks and placeholders for some of the graphics.
I remember not wanting to be in the room while it was playing. Surprisingly, the cast and crew were still in the room when the lights came up.
It was useful to see it with a real audience, though. Audience reaction showed us where we had to make cuts, and so, a few months later, we had a second cut running 74 minutes.
I moved onto the audio. All of our onscreen dialogue was recorded with a shotgun mike directly into the camcorder so the audio was, in theory, synched with the video, although the software occasionally disagreed and shifted things. Otherwise, all I had to do to was adjust volumes for individual clips until they were consistent.
On a dare from me, Mullet composed a crazy patchwork of a score, ranging from solo piano to a wall of indescribable noise. Dave Pearce recorded some songs that Mullet had written. Scott McClelland, a recording engineer/musician/music teacher, mixed and mastered the songs for us, and I used Final Cut Pro 1 to mix the final audio together. I exported everything as QuickTime movies.
We showed the car theft scene at Second Ciné, a show hosted by Andrew Currie, at the Tim Sims. Each month, AC screened a number of short comedies, having the director and/or performers come up after the short for an interview.
The Second Ciné audience wasn’t moved to violence, and I even got asked about what camera we’d used, likely because of the clarity of the image when we were shooting through the windshield (a Cokin circular polarizer and an ND filter, which made my one-chip Ultura look a lot better than it should have).
AC nominated us for newcomer of the year for the season-ending awards, but we lost out. Still, it was nice to be nominated, and, no, we didn’t prepare a speech in case we won. We would like to thank the academy….
Next time, the financial aspects of a no-budget feature….
Mullet and I spent one memorable week sitting in front of that G4 trying to put together our first cut. It was sheer hell, so in a blaze of inspiration, we called it Hell Week.
Our self-taught shooting style came home to roost that week.
Our coverage was thin, so we didn’t have a lot of alternatives or any way of speeding scenes up—there was nothing to cut to. So… things had to stay as they were, usually as master shots. To match shots, we had to let things go on too long, and, to further complicate matters, very few shots matched perfectly (no continuity person to notice these things). We ended up using takes because they matched rather than using the best takes. That was the hell part of Hell Week.
There are a lot of first-time filmmakers who have made and who will make the same mistakes, but the silver lining is that we all learn more about putting moving images together when trying to solve problems than when something together easily (an equally important lesson is, of course, to learn from the mistakes and not repeat them the next time).
Today, we edit as we go, so as soon as we’ve shot something I start to put it together to see what we have. Otherwise, you’re blind to what you’ve missed, and your mistakes will likely not be fixable, unless your cast and locations are still available.
Another frustration appeared during Hell Week, something we couldn’t avoid that late in the project.
We’d started working on the project on with Adobe Premiere 6, which proved to be crash-prone and completely unreliable for anything other than crashing the computer at random moments. We had each scene in a separate project file to keep things manageable, but it didn’t matter how long or short the scene was—the software would crash regularly, and whatever work we’d done since the previous save was gone.
To be fair, we were probably demanding too much of Premiere. If we’d been working on a short, it probably would have worked just fine, but even keeping scenes in their own project files was probably too much at times.
Nonetheless, after the rough cut was done, I switched over to the first version of Final Cut Pro, which proved to be much more stable. I ended up using FCP to recreate the editing of a few scenes, and the rest I exported from Premiere as QuickTime movies. I stuck to the separate project files for each scene, but the crashing stopped and we were able to get through the rest of the process much easier.
Despite the obstacles, we had a 124-minute rough cut assembled by December, 2002. Technical errors, the lack of coverage, and the convoluted plot—for a first, student effort, I don’t think we did that badly. If you were to set a classroom full of first-year film students off and running for 8 months of Saturday shoots and the same budget, I think we would have held our own.
Some of the jokes were really good—a DVD gag played really well in particular, and we were complimented by a few people about specific gags that worked well. Some of it doesn’t work, and the story isn’t clear enough at times to make sense—we more or less walked away from the plot during Act 2.
The ending didn’t work very well, but it was because we made a classic rookie mistake when we reshoot parts of it to try to make it work. We didn’t reshoot the entire scene—just the specific shot needed. The retakes, naturally, didn’t match the original shots.
Lesson learned: any time you have to reshoot something, always look at the footage for the entire scene or sequence, print screen caps, and take them with you to the location. Or you can save yourself headaches by getting yourself a really good continuity person!
The project taught us things that we wouldn’t have learned otherwise.
The team itself was well-balanced. Mullet has a lot more performing experience than I do, so in our live performances he did better than I did because I wasn’t as experienced in improv—and we improvised almost everything on stage. With a script, I could hold up my end of the stick better, and the team was much more balanced, something that has carried on in our following projects and live performances.
We both learned a lot about storytelling with video, and the old saying about telling a story three times (on the page, in the camera, in the editing) is very true.
It was time to show our project to an audience to start working on pacing and structure. We had a Christmas Party at the now-defunct Tim Sims Playhouse for the cast, crew, and some invited guests, and we showed them the 124-minute version with temp audio tracks and placeholders for some of the graphics.
I remember not wanting to be in the room while it was playing. Surprisingly, the cast and crew were still in the room when the lights came up.
It was useful to see it with a real audience, though. Audience reaction showed us where we had to make cuts, and so, a few months later, we had a second cut running 74 minutes.
I moved onto the audio. All of our onscreen dialogue was recorded with a shotgun mike directly into the camcorder so the audio was, in theory, synched with the video, although the software occasionally disagreed and shifted things. Otherwise, all I had to do to was adjust volumes for individual clips until they were consistent.
On a dare from me, Mullet composed a crazy patchwork of a score, ranging from solo piano to a wall of indescribable noise. Dave Pearce recorded some songs that Mullet had written. Scott McClelland, a recording engineer/musician/music teacher, mixed and mastered the songs for us, and I used Final Cut Pro 1 to mix the final audio together. I exported everything as QuickTime movies.
We showed the car theft scene at Second Ciné, a show hosted by Andrew Currie, at the Tim Sims. Each month, AC screened a number of short comedies, having the director and/or performers come up after the short for an interview.
The Second Ciné audience wasn’t moved to violence, and I even got asked about what camera we’d used, likely because of the clarity of the image when we were shooting through the windshield (a Cokin circular polarizer and an ND filter, which made my one-chip Ultura look a lot better than it should have).
AC nominated us for newcomer of the year for the season-ending awards, but we lost out. Still, it was nice to be nominated, and, no, we didn’t prepare a speech in case we won. We would like to thank the academy….
Next time, the financial aspects of a no-budget feature….
Wednesday, August 29, 2007
End of Summer (almost) Roundup
OK, my biweekly promise has gone the way of Paris Hilton's dignity. I can't even remember what I wrote the last time, so I'm probably going to repeat myself from earlier posts here.
So here's an update on the Miller & Mullet DVD:
1. This week, Andrew Curriecopied the media and project files for Can onto my external hard drive. I now have his rough edit on my Final Cut timeline. The cut turned out really, really well. It's different from how we would have shot it on our own, which makes it a better short, I think. We've been doing a more theatrical style of shooting, and Andrew shot Can in a dynamic, visually interesting way. The cut he gave us is a rough edit, so the cuts have to trimmed for timing and any future sound effects added, but the overall shape is there. The current running time is 4 minutes, and I'd expect at least 30 seconds to come off that, if not more (depending on how much I play with speed).
2. We did all the interiors for Bags, the short formerly known as Dressing Room (finally found the one-derful, er, one word title we wanted). We shot the stage manager scenes with Alastair Forbes, a Theatresports colleague of Mullet's and an outstanding talent. Alastair graciously allowwed us to shoot in his home, so he gets two gold stars on his Miller & Mullet report card. A week later, we shot my interior pickups to replace my laryngitis-plagued original takes. Mullet directed me, and while I was batch-capturing the takes, a few things made me laugh out loud (which is rare becuaase I normally cpature stuff as soon as I get home from shooting, which means I'm watching something that was repeated ad nauseum all day and has lost all the funny by the time I watch the multiple takes of said something repeat itself on my camcorder). I still have to sit down and watch all the takes for the 3 shooting days before I even attempt to start cutting something together. Unlike Can, I'm too close to this to be excited about it --if the magic struck this production, too, I won't know until I play it for another person and see their reactions. The only remaining scene is an exterior with Alastair's character to wrap up the short, which we'll shoot when schedules permit.
3. I've dusted off our "boot camp" movie, Babysitters. We shot this from October 2001 to July 2002 and ended up wtih a 74-minute feature, all shot on a single-chip Canon Ultura. Insane? Yes. We went into it with the goal of putting something together that we could use as a calling card, but it was also meant to be our self-taught film school. We shot almost every Saturday, dragging friends Jeff, Kasia, and Nic out to help us shoot an episodic story about two babysitters (guess who?) who lose the baby they're supposed to care for --will theyy get the baby home? We ran a screening for cast and crew in 2002 and then put it quietly aside (after about a year's worth of post-producction). We plan on doing another screening this fall or in the winter for the cast, crew, and friends jsut so I can get it off my hard drives.
4. I'm re-editing a short we did in 2004, Stalls. Stalls was our first post-Babysitters project, so it has some similarities to it, such as a linear storytelling style and limited coverage. I've been working on it, on and off, since then, but we did have a cut that we submitted to the 2006 San Diego Comic-con film festival in conjunction with our entry into the small press section that year. The short didn't get in, so I've been tinkering iwth it since then. I'll likely turn a very linear story into a non-linear story. comparing Stalls to Babysitters, the first thing I notice now is that the writing improved greatly, as did the performances (especially mine --I was taking a directing class at Ryerson U when we shot it, and the Meisner technique had taken hold of my performing by then). but we cut out all the distractions and shaggy dog plotting that makes Babysitters a mess, and told a very linear story. But with us not shooting a lot of coverage, there's no room to change that linear story very much, so I'm going to break the plot up a bit with flashbacks to make it, hopefully, a less predictable and more lively short.
So that's where we stand --3 shorts in various stages of post, plus an old "feature" awaiting its final tweaking.
The NeutrinoPlex show ended in July, and I had withdrawal symptoms for a couple of Fridays afterwards. I think I benefitted from being part of the show, even if I wasn't actually shooting stuff myself. I was the cheif button pusher, running the intro and outro DVD clips, cueing up mini-DV tapes, and switching each scene. Three teams went out and shot 3 scenes each of a story, rushing the tapes back to the theatre, where we started playing them after about 20 minutes of videos or standup comedians. It was a high-wire act, with late tapes spelling disaster a few times, but otherwise, when the show worked, it was comedic gold with improvised scenes that made the most of what the performers could find and use on the bright lights of the Danforth. Each week, before the show, we'd watch the prior week's archive tape, and it would be the first time I'd really see the show without the distraction of loading and unloading tapes. I learned the value of closeups, making relationships between characters clear and distinct right from the start, and many other lessons that will come to me after I've posted this missive. I would say that the NeutrinoPlex cast and crew, plus the inestimable director, Andrew Currie, provided me with a course in no-budget, on the fly filmmaking that has freed me up from how I've thought out shots and cuts before. All for the price of dinner every other week! If and when they do the show again, I'd be glad to be asked back.
Alastair Forbes, the improviser I plugged earlier, asked us to help him out with some shorts he and Natalie Urquehart were putting together. Mullet's off for a while after some nasty dental work, so I volunteered. I was glad I did --the shoots were all fun and very easy-going. I did minimal prep for the 2 shorts, Spy Bum and Office Wizards, basically figuring out the style of shooting for both. For the Office Wizards short, I emulated the Office (UK version) with handheld camera, riding the zoom lever in and out to give it a documentary feel (I didn't hide behind office plants or anything like that --the emulation was a bit limited by geography). For Spy BUm, I watched the sole 007 tape I own, the George Lazenby Bond, On Her Majesty's HOlidays in the Sun. It had a very conventional '60's style, so I shot Spy Bum entirely on tripod, zooming only when needing to reframe (and practically panning on each zoom as well). Both shorts were a joy to shoot --the cast, all improvisers, worked out the beats with a few rehearsals, and then did the scene beautifully each time. Office Wizards was done from top to bottom each time, and with a master shot, 2-shots, closeups, and inserts, I think they did it about 20 times in total. Yet, with the skills of the improvisers at hand, they made minor variations work each time, and I am glad I'm not editing it as I don't think it will be easy to pick one take over another (aside from a few takes that did go south). With Spy Bum, the short was broken into several scenes, so it's much more of a bits 'n' pieces production. Again, the cast were amazing. My hope is that I managed to get that magic on tape so that Alastair can cut them into something wonderful.
So, now that the summer is rolling into Labour Day (the sound of summer ending in Toronto is the airshow at the CNE), I'm shifting into post. I also ahve to start writing more scripts for our winter shooting plans, which would likely be in January and February (interiors, naturally). And then there's the theme song we need to write and get someone to perform. More about that next time --hopefully in two weeks....
So here's an update on the Miller & Mullet DVD:
1. This week, Andrew Curriecopied the media and project files for Can onto my external hard drive. I now have his rough edit on my Final Cut timeline. The cut turned out really, really well. It's different from how we would have shot it on our own, which makes it a better short, I think. We've been doing a more theatrical style of shooting, and Andrew shot Can in a dynamic, visually interesting way. The cut he gave us is a rough edit, so the cuts have to trimmed for timing and any future sound effects added, but the overall shape is there. The current running time is 4 minutes, and I'd expect at least 30 seconds to come off that, if not more (depending on how much I play with speed).
2. We did all the interiors for Bags, the short formerly known as Dressing Room (finally found the one-derful, er, one word title we wanted). We shot the stage manager scenes with Alastair Forbes, a Theatresports colleague of Mullet's and an outstanding talent. Alastair graciously allowwed us to shoot in his home, so he gets two gold stars on his Miller & Mullet report card. A week later, we shot my interior pickups to replace my laryngitis-plagued original takes. Mullet directed me, and while I was batch-capturing the takes, a few things made me laugh out loud (which is rare becuaase I normally cpature stuff as soon as I get home from shooting, which means I'm watching something that was repeated ad nauseum all day and has lost all the funny by the time I watch the multiple takes of said something repeat itself on my camcorder). I still have to sit down and watch all the takes for the 3 shooting days before I even attempt to start cutting something together. Unlike Can, I'm too close to this to be excited about it --if the magic struck this production, too, I won't know until I play it for another person and see their reactions. The only remaining scene is an exterior with Alastair's character to wrap up the short, which we'll shoot when schedules permit.
3. I've dusted off our "boot camp" movie, Babysitters. We shot this from October 2001 to July 2002 and ended up wtih a 74-minute feature, all shot on a single-chip Canon Ultura. Insane? Yes. We went into it with the goal of putting something together that we could use as a calling card, but it was also meant to be our self-taught film school. We shot almost every Saturday, dragging friends Jeff, Kasia, and Nic out to help us shoot an episodic story about two babysitters (guess who?) who lose the baby they're supposed to care for --will theyy get the baby home? We ran a screening for cast and crew in 2002 and then put it quietly aside (after about a year's worth of post-producction). We plan on doing another screening this fall or in the winter for the cast, crew, and friends jsut so I can get it off my hard drives.
4. I'm re-editing a short we did in 2004, Stalls. Stalls was our first post-Babysitters project, so it has some similarities to it, such as a linear storytelling style and limited coverage. I've been working on it, on and off, since then, but we did have a cut that we submitted to the 2006 San Diego Comic-con film festival in conjunction with our entry into the small press section that year. The short didn't get in, so I've been tinkering iwth it since then. I'll likely turn a very linear story into a non-linear story. comparing Stalls to Babysitters, the first thing I notice now is that the writing improved greatly, as did the performances (especially mine --I was taking a directing class at Ryerson U when we shot it, and the Meisner technique had taken hold of my performing by then). but we cut out all the distractions and shaggy dog plotting that makes Babysitters a mess, and told a very linear story. But with us not shooting a lot of coverage, there's no room to change that linear story very much, so I'm going to break the plot up a bit with flashbacks to make it, hopefully, a less predictable and more lively short.
So that's where we stand --3 shorts in various stages of post, plus an old "feature" awaiting its final tweaking.
The NeutrinoPlex show ended in July, and I had withdrawal symptoms for a couple of Fridays afterwards. I think I benefitted from being part of the show, even if I wasn't actually shooting stuff myself. I was the cheif button pusher, running the intro and outro DVD clips, cueing up mini-DV tapes, and switching each scene. Three teams went out and shot 3 scenes each of a story, rushing the tapes back to the theatre, where we started playing them after about 20 minutes of videos or standup comedians. It was a high-wire act, with late tapes spelling disaster a few times, but otherwise, when the show worked, it was comedic gold with improvised scenes that made the most of what the performers could find and use on the bright lights of the Danforth. Each week, before the show, we'd watch the prior week's archive tape, and it would be the first time I'd really see the show without the distraction of loading and unloading tapes. I learned the value of closeups, making relationships between characters clear and distinct right from the start, and many other lessons that will come to me after I've posted this missive. I would say that the NeutrinoPlex cast and crew, plus the inestimable director, Andrew Currie, provided me with a course in no-budget, on the fly filmmaking that has freed me up from how I've thought out shots and cuts before. All for the price of dinner every other week! If and when they do the show again, I'd be glad to be asked back.
Alastair Forbes, the improviser I plugged earlier, asked us to help him out with some shorts he and Natalie Urquehart were putting together. Mullet's off for a while after some nasty dental work, so I volunteered. I was glad I did --the shoots were all fun and very easy-going. I did minimal prep for the 2 shorts, Spy Bum and Office Wizards, basically figuring out the style of shooting for both. For the Office Wizards short, I emulated the Office (UK version) with handheld camera, riding the zoom lever in and out to give it a documentary feel (I didn't hide behind office plants or anything like that --the emulation was a bit limited by geography). For Spy BUm, I watched the sole 007 tape I own, the George Lazenby Bond, On Her Majesty's HOlidays in the Sun. It had a very conventional '60's style, so I shot Spy Bum entirely on tripod, zooming only when needing to reframe (and practically panning on each zoom as well). Both shorts were a joy to shoot --the cast, all improvisers, worked out the beats with a few rehearsals, and then did the scene beautifully each time. Office Wizards was done from top to bottom each time, and with a master shot, 2-shots, closeups, and inserts, I think they did it about 20 times in total. Yet, with the skills of the improvisers at hand, they made minor variations work each time, and I am glad I'm not editing it as I don't think it will be easy to pick one take over another (aside from a few takes that did go south). With Spy Bum, the short was broken into several scenes, so it's much more of a bits 'n' pieces production. Again, the cast were amazing. My hope is that I managed to get that magic on tape so that Alastair can cut them into something wonderful.
So, now that the summer is rolling into Labour Day (the sound of summer ending in Toronto is the airshow at the CNE), I'm shifting into post. I also ahve to start writing more scripts for our winter shooting plans, which would likely be in January and February (interiors, naturally). And then there's the theme song we need to write and get someone to perform. More about that next time --hopefully in two weeks....
Subscribe to:
Posts (Atom)